Configuration for User Monitoring and Replay
Step-by-step configuration of Germain UX's User Session Monitoring and Session Replay.
Enable
By default, User Session Replay is enabled for each User Monitoring Profile. If it has been disabled, you can re-enable it by following these steps:
Go to Germain Workspace > Left Menu > Analytics > UX Monitoring Profiles
Select a profile
Check Session Replay Monitoring and click :save: Save to apply your changes
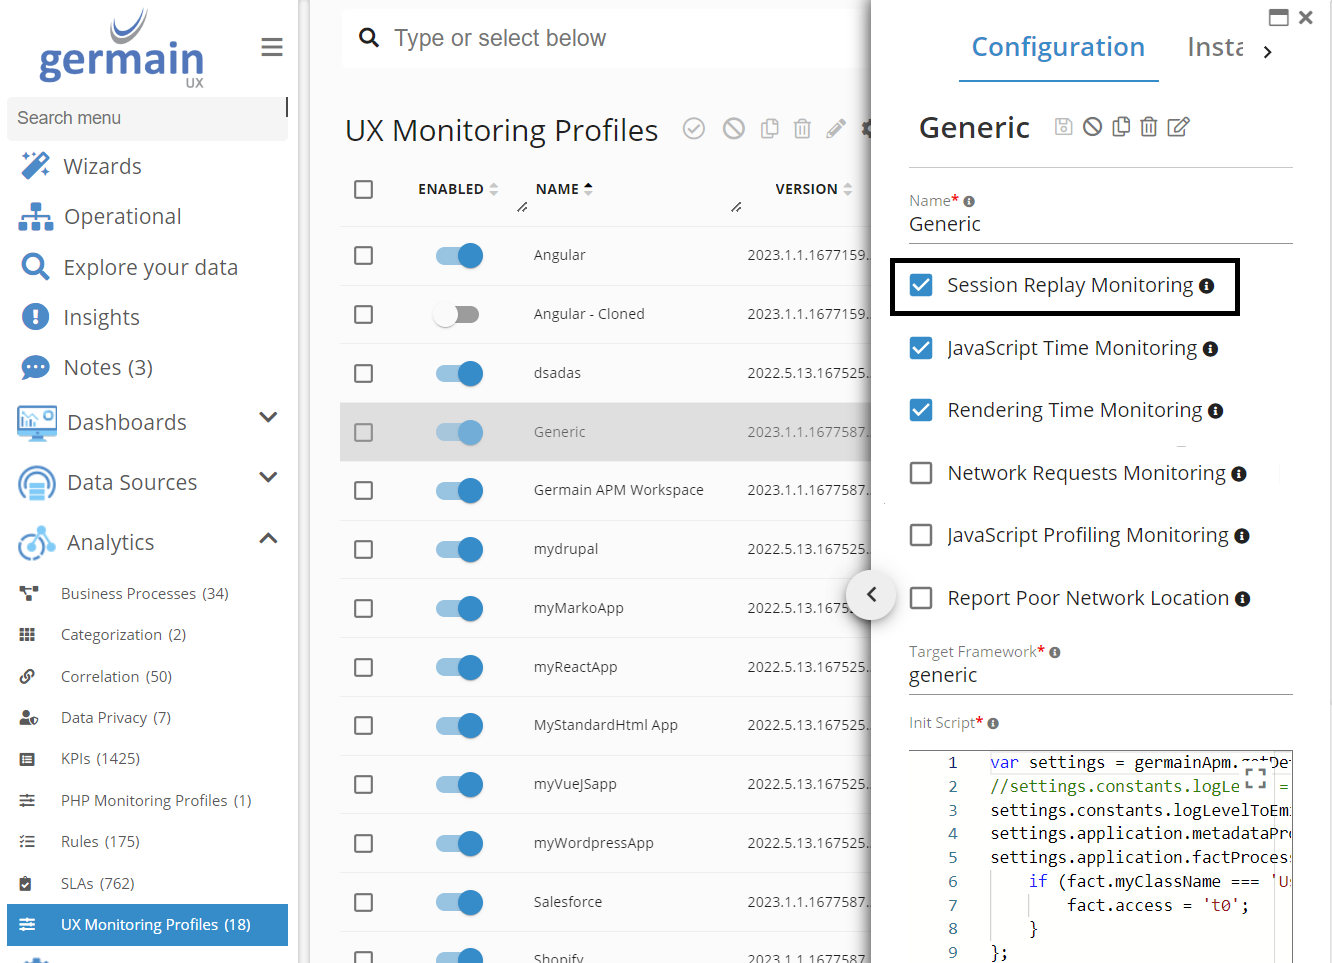
Session Replay Monitoring enabled
Disable
You can disable User Session Replay for each UX Monitoring Profile by following these steps:
Go to Germain Workspace > Left Menu > Analytics > UX Monitoring Profiles
Select a profile
Uncheck Session Replay Monitoring and click :save: Save to apply your changes
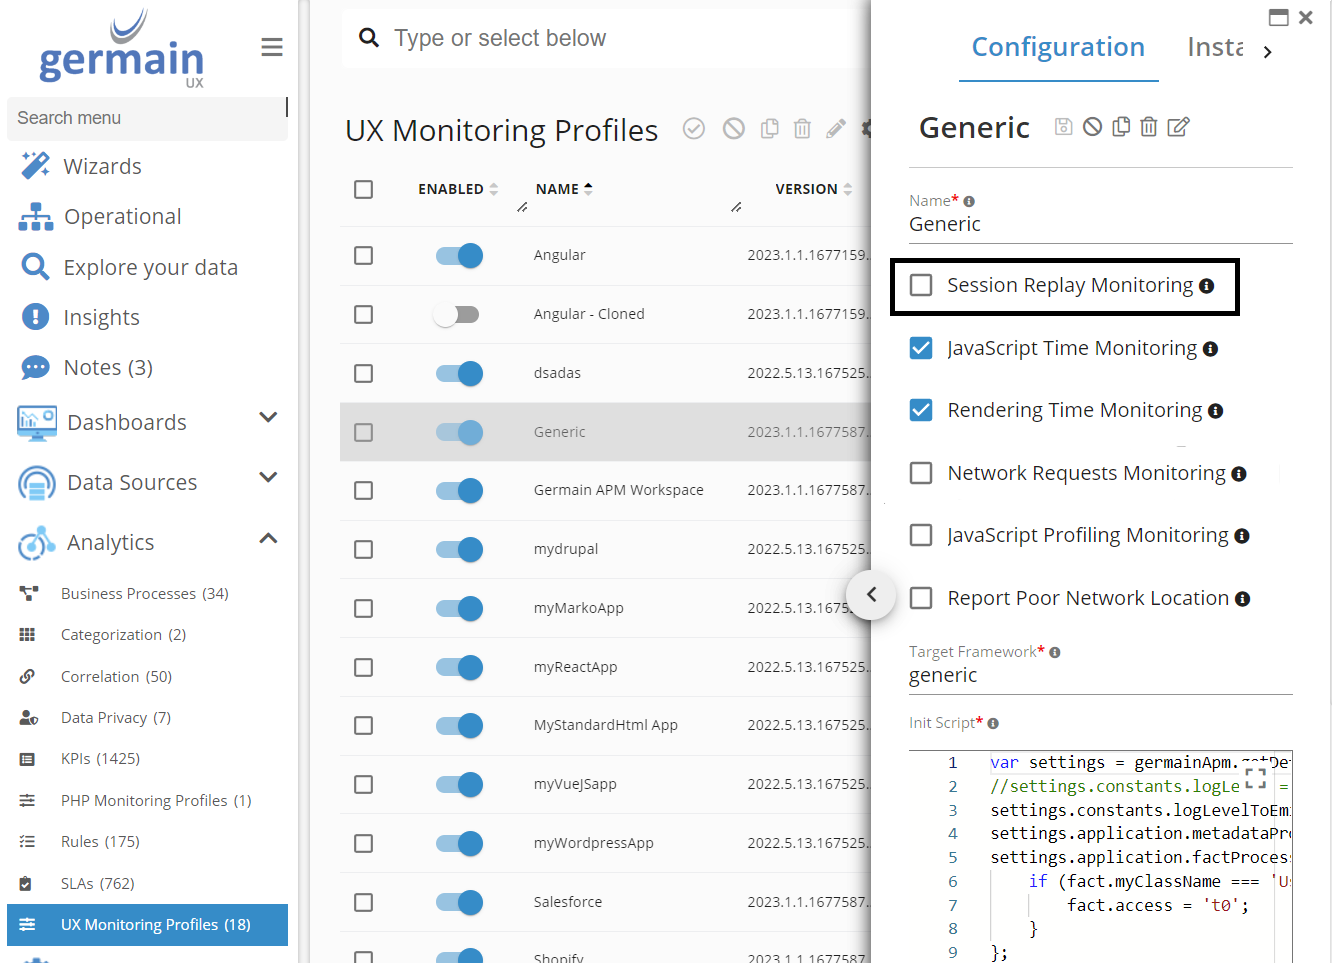
Session Replay Monitoring disabled
You can also disable User Session Replay for all profiles at once by turning off Session Replay Data in the general UX and Session Replay Settings. Please follow the steps below:
Go to Germain Workspace > Left Menu > System > UX and Session Replay Settings
Disable Session Replay Data and click :save: Save to apply your changes

Disable User Session Replay Monitoring for the entire Germain UX
Session Timeout
By default, any ongoing session will time out if no event has been collected one hour after the last received event. The session will be marked as 'Timed Out,' and the ongoing session will be closed. The next event received after this timeout threshold will start a new session.
To configure the Session Timeout threshold, follow the steps below:
Go to Germain Workspace > Left Menu > System > UX and Session Replay Settings
Update the Session Timeout (in minutes) field in the Session Replay section to the desired value
Click :save: Save to apply your changes

User Replay Session Timeout settings
Session Recording
Length
You can configure Germain UX so that the user session is recorded for a fixed length, e.g., 1 hour. By default, there is no limit on the session recording duration.
Use settings.constants.maxSessionDurationMillis in the Init Script to set the maximum session recording duration.
The following code sample demonstrates how to configure it for 1 hour:
settings.constants.maxSessionDurationMillis = 3600; // 1 hour value in millisecondsMode
Germain UX gives you the option to
Record separate session for each user login. Add this line in the initScript of the Germain UX - RUM Js (or RUM Ext):
JSsettings.constants.createNewSessionIfUsernameChanges = true;Record a single session for any logins that are issued from the same browser/desktop
Add this line in the initScript of the Germain UX - RUM Js (or RUM Ext):CODEprofile:settings.constants.createNewSessionIfUsernameChanges = false;
Events and Transactions Stream
The list of events and transactions available on the right-hand side of the user session replay player is configurable. By default, we show all KPIs that can be correlated with the User Session Replay; however, you can disable some from the player by following the steps below:
Go to Germain Workspace > Left Menu > Analytics > KPIs
Select User Session Replay KPI
Update the Child KPIs multi-select list
Click :save: Save to apply your changes
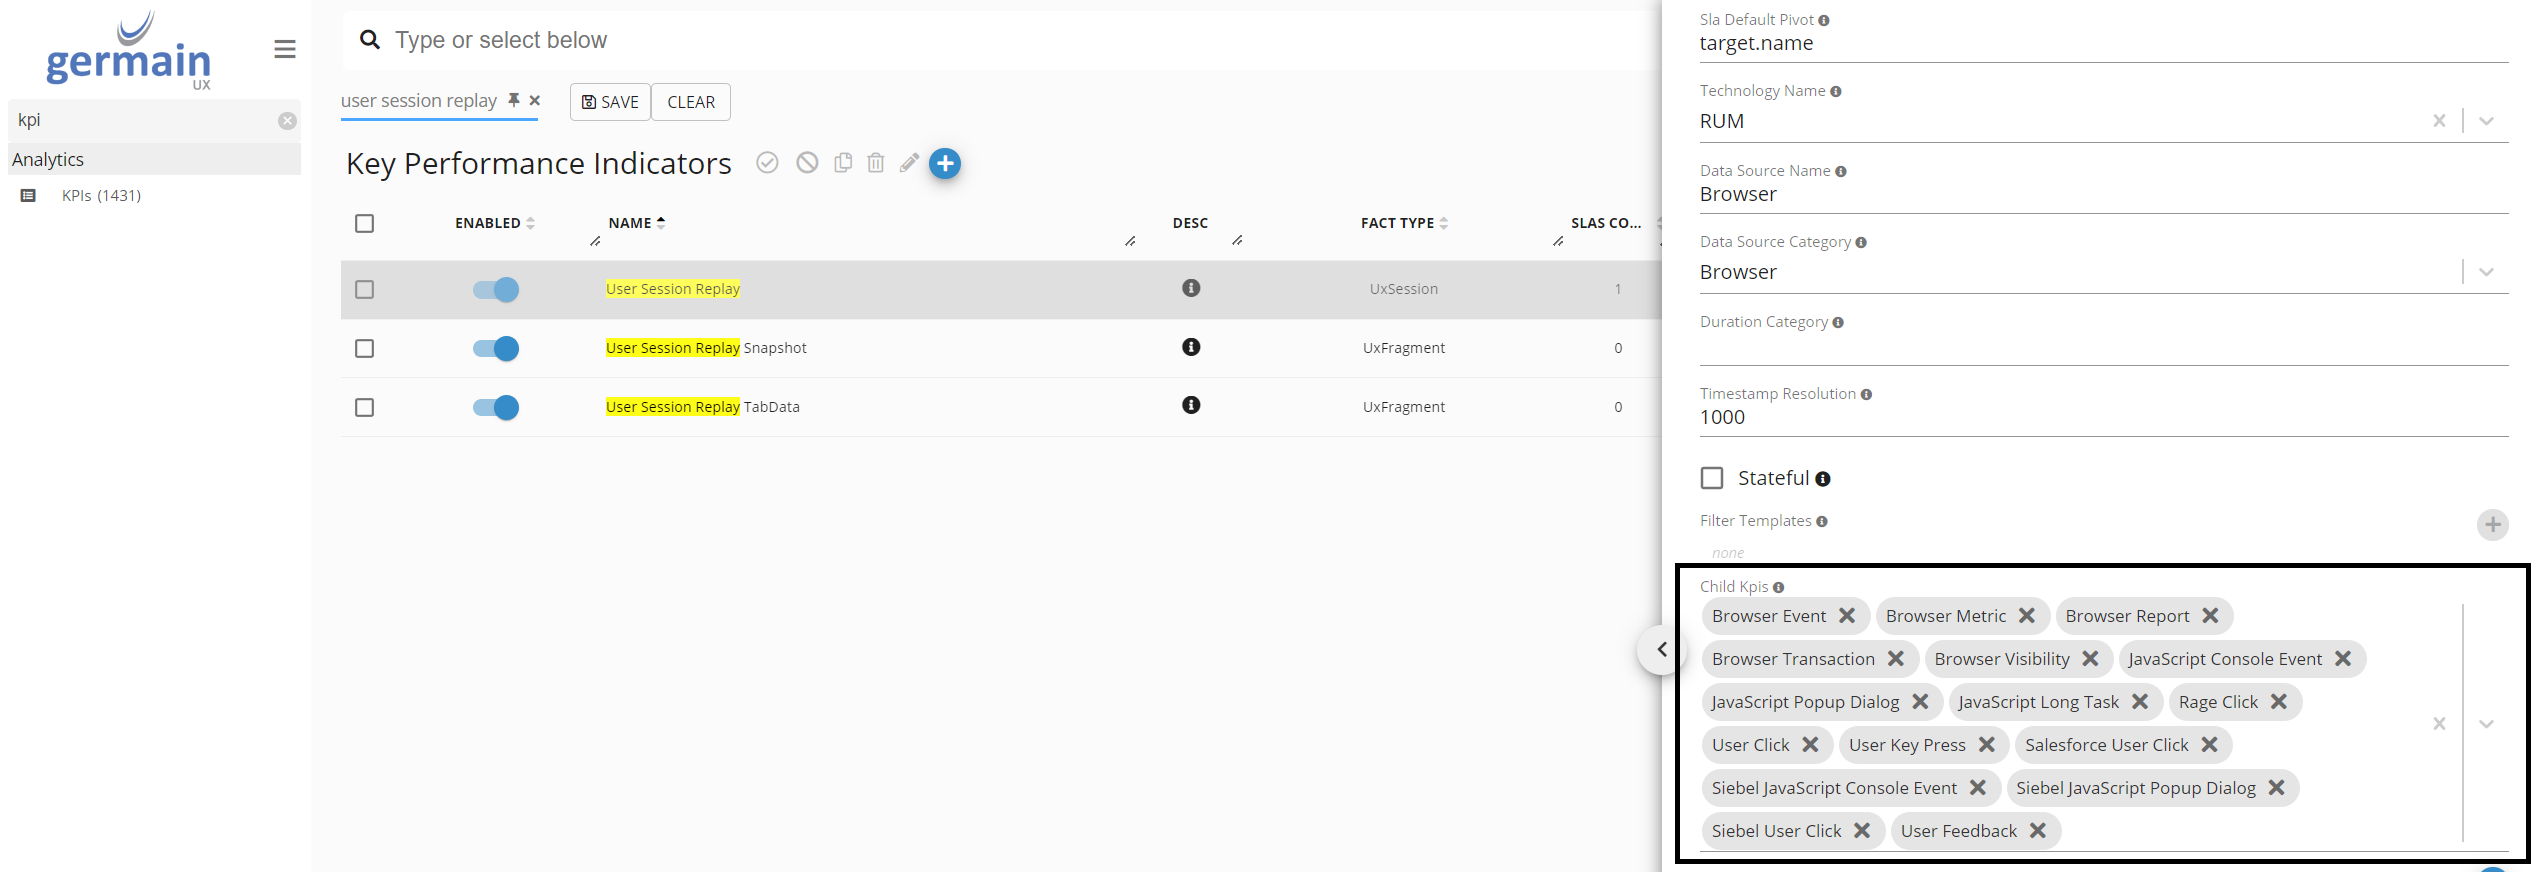
Child KPIs settings for User Session Replay KPI
Dead, Error and Rage Click Monitoring Configuration
More details on Dead, Error and Rage Click Monitoring
User Activity
User activity periods are represented by orange bars at the top of the Session Replay player. These periods of time represent multiple consecutive events done by the end user on the monitored application.

User Activity on Session Replay player
To configure what type of events you want to take into account to generate these activity periods and what shouldn’t, follow the steps below. This configuration applies to all UX Monitoring Profiles:
Go to Germain Workspace > Left Menu > System > UX and Session Replay Settings
Update the User Activity multi-select field in the Session Replay section (all events selected in the list will generate user activities)
Click :save: Save to apply your changes

User Activity Settings
Data Privacy (GDPR, PCI)
Similar to any other data collected by Germain, you have full control over the data captured by Germain's JS or browser extension. You decide what data is collected, what isn't, and whether the data is encrypted or anonymized. All of these configurations are customizable according to your preferences.
Bot/Crawler Agent Exclusion (Googlebot, Yandex bot, etc)
You can disable User Experience Monitoring for selected user agents. Use this feature if you don’t want UX monitoring data from particular bots, crawlers, or end users' browsers.
By default, we exclude the following bots:
Baiduspider
Bingbot
DuckDuckBot
Exabot
Facebot and Facebookexternalhit
Googlebot
Ia_archiver
Sogou
Slurp
YandexBot
Configuration:
You can enable or disable default Bot/Crawler Agent Exclusion settings when deploying RUM JS monitoring for the first time by activating the Bot/Crawler Agent Exclusion option on the wizard.
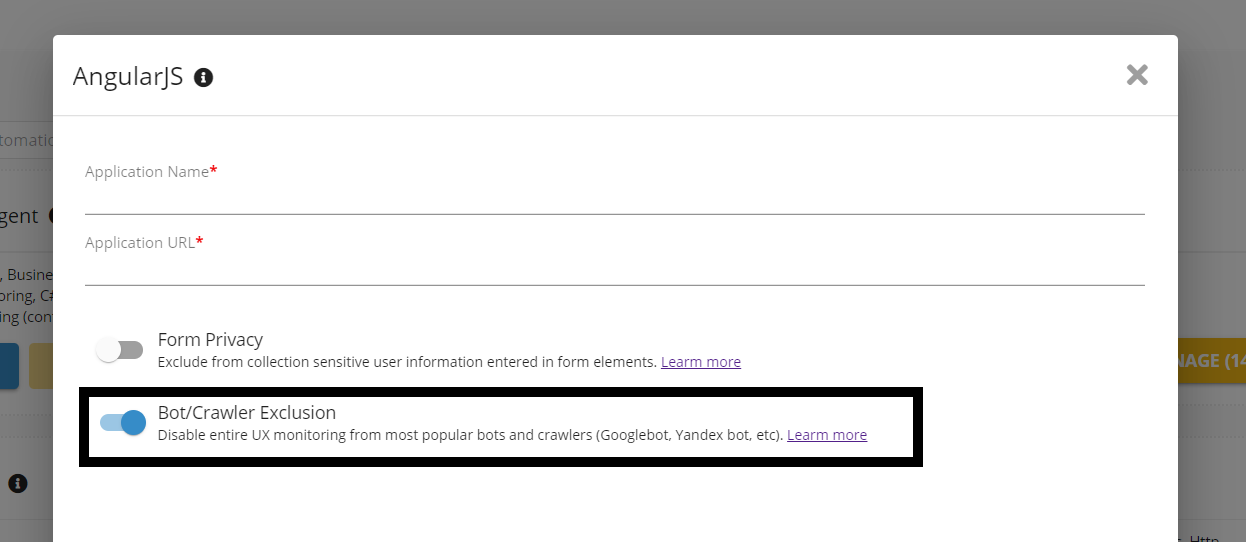
Bot/Crawler Agent Exclusion Option on RUM JS Wizard
To update the Bot/Crawler Agent Exclusion list, follow the steps below:
Go to Germain Workspace > Left Menu > Analytics > UX Monitoring Profiles
Select a profile
Add/Modify/Remove user agents under Excluded User Agents
The following example displays all enabled default excluded user agents.
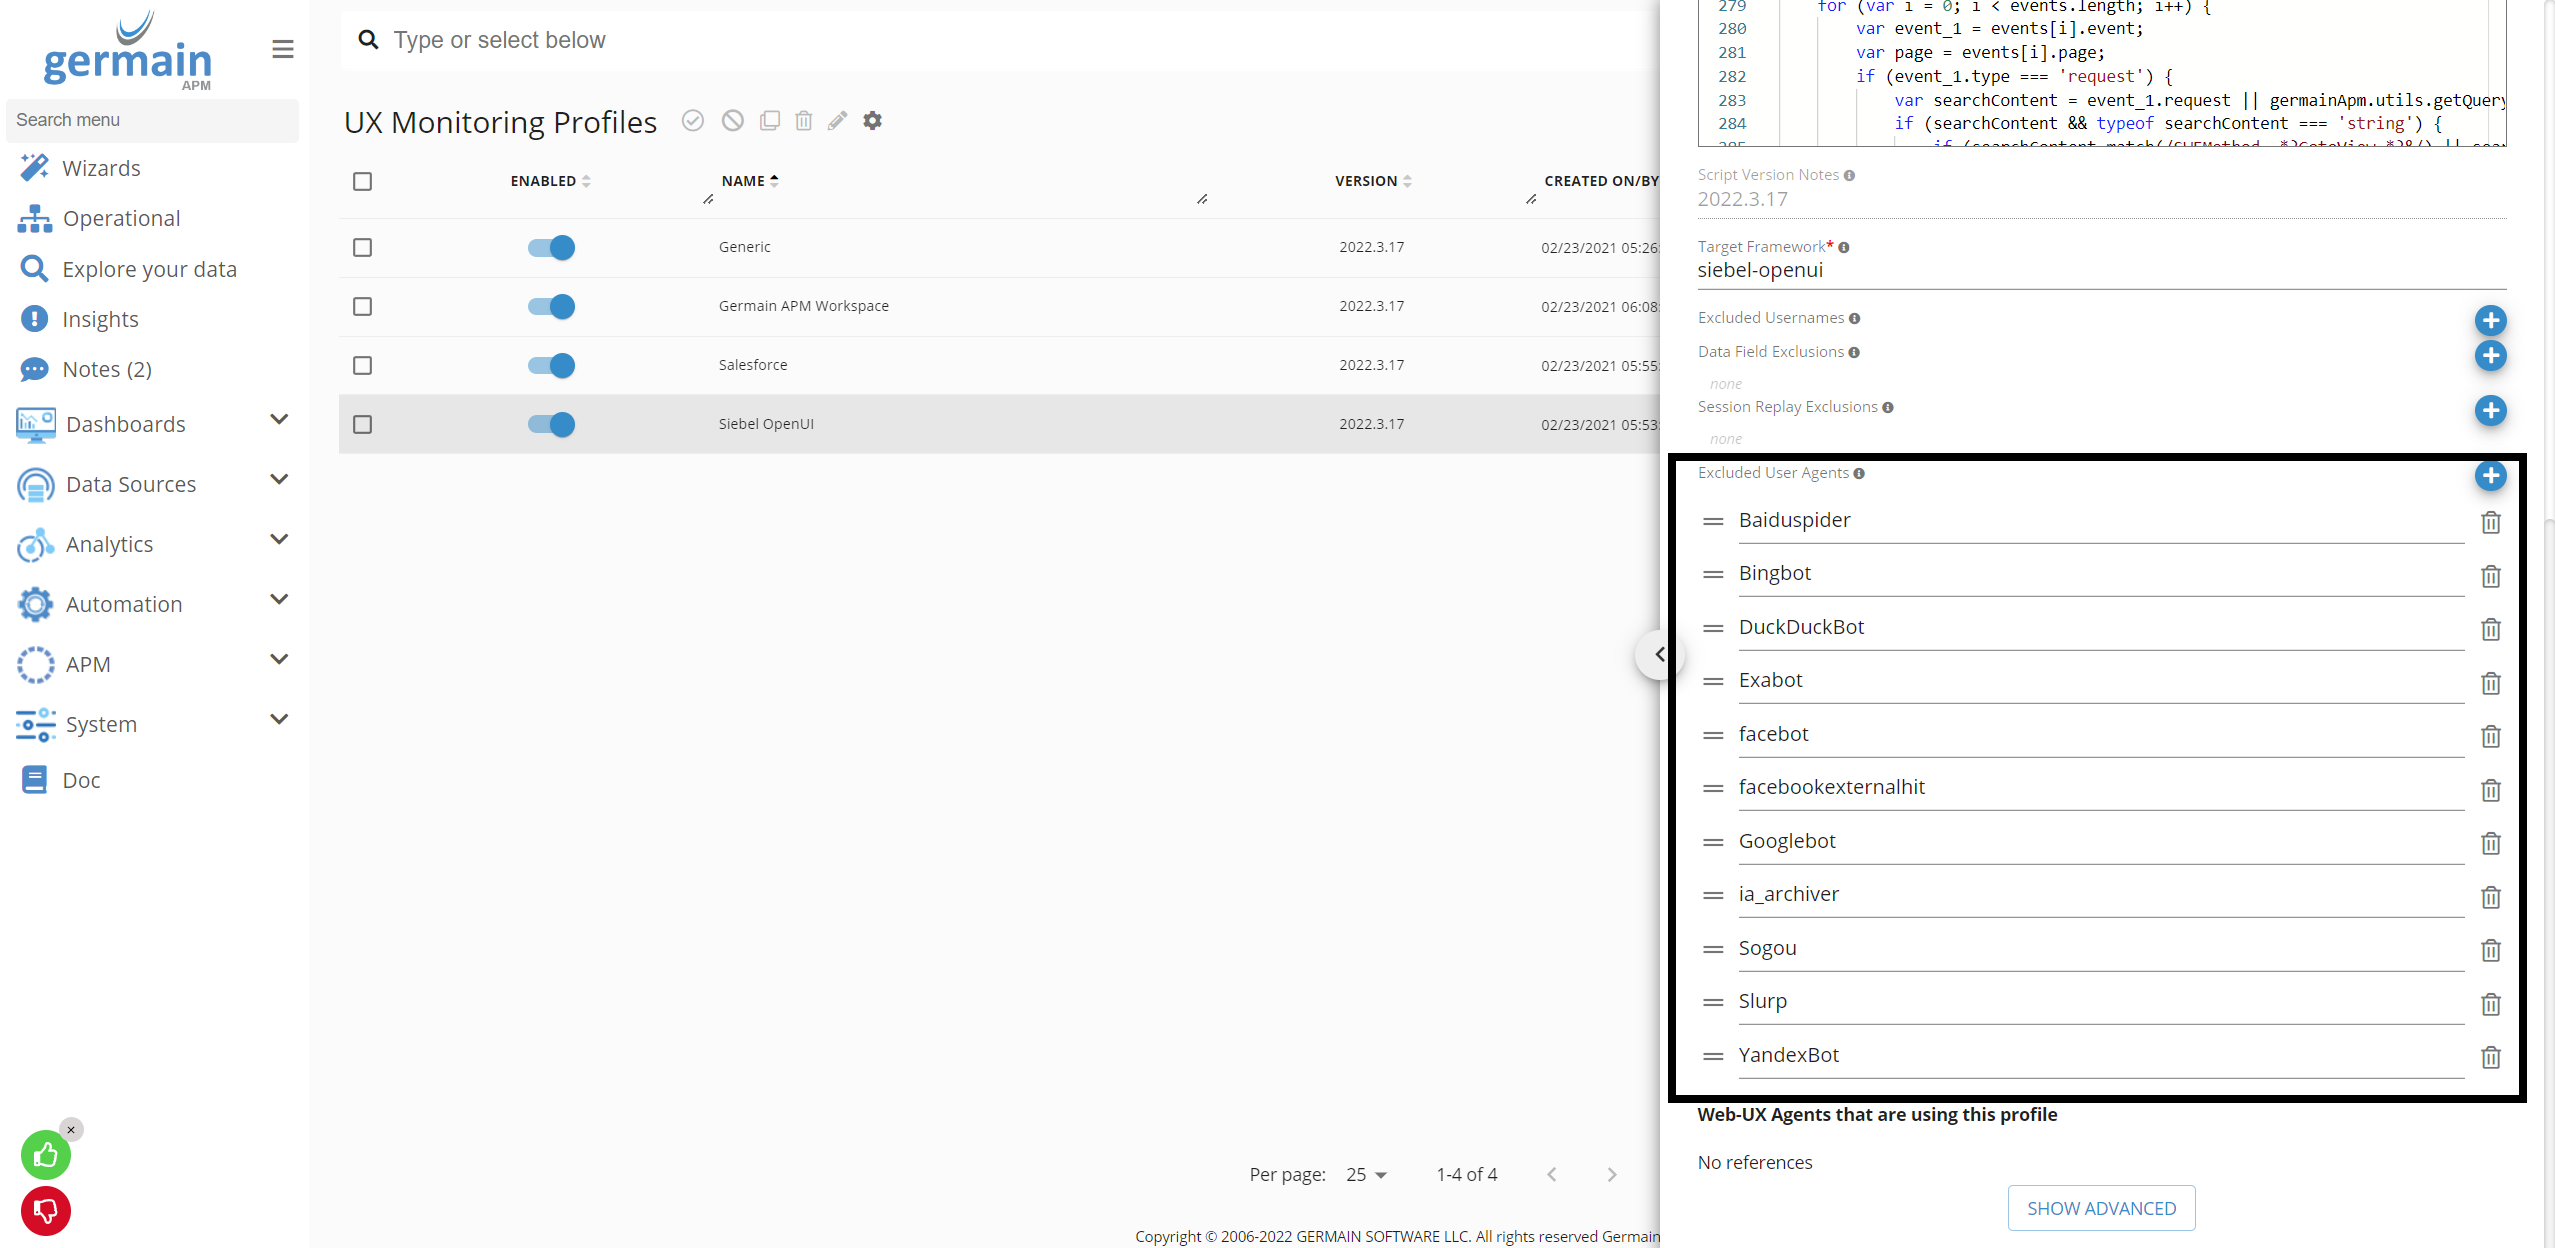
Bot/Crawler Agent Exclusion Configuration
User/IP Exclusion
Blacklist and Whitelist IP Configuration
You can enable or disable User Monitoring and Replay for selected IPs or IP ranges.
Use the blacklist feature if you don’t want UX monitoring data, e.g., from your automated or synthetic users.
Use the include feature if you want UX monitoring data only from certain desktops/users (whitelist settings will override blacklist settings).
By default, the blacklist and whitelist are empty. An empty whitelist means that UX monitoring is enabled for all IP addresses. You can provide either a single IP or a comma-separated start IP and end IP.
Configuration:
To configure Blacklist/Whitelist IP, follow the steps below:
Go to Germain Workspace > Left Menu > Analytics > UX Monitoring Profiles
Select a profile
Add a new IP exclusion under Excluded IP Ranges
Add a new IP whitelist under Included IP Ranges
The following example shows one excluded IP (10.0.1.1) and one whitelisted IP range (all IP addresses between 192.168.0.0 and 192.168.255.255, including start and end, will be included).
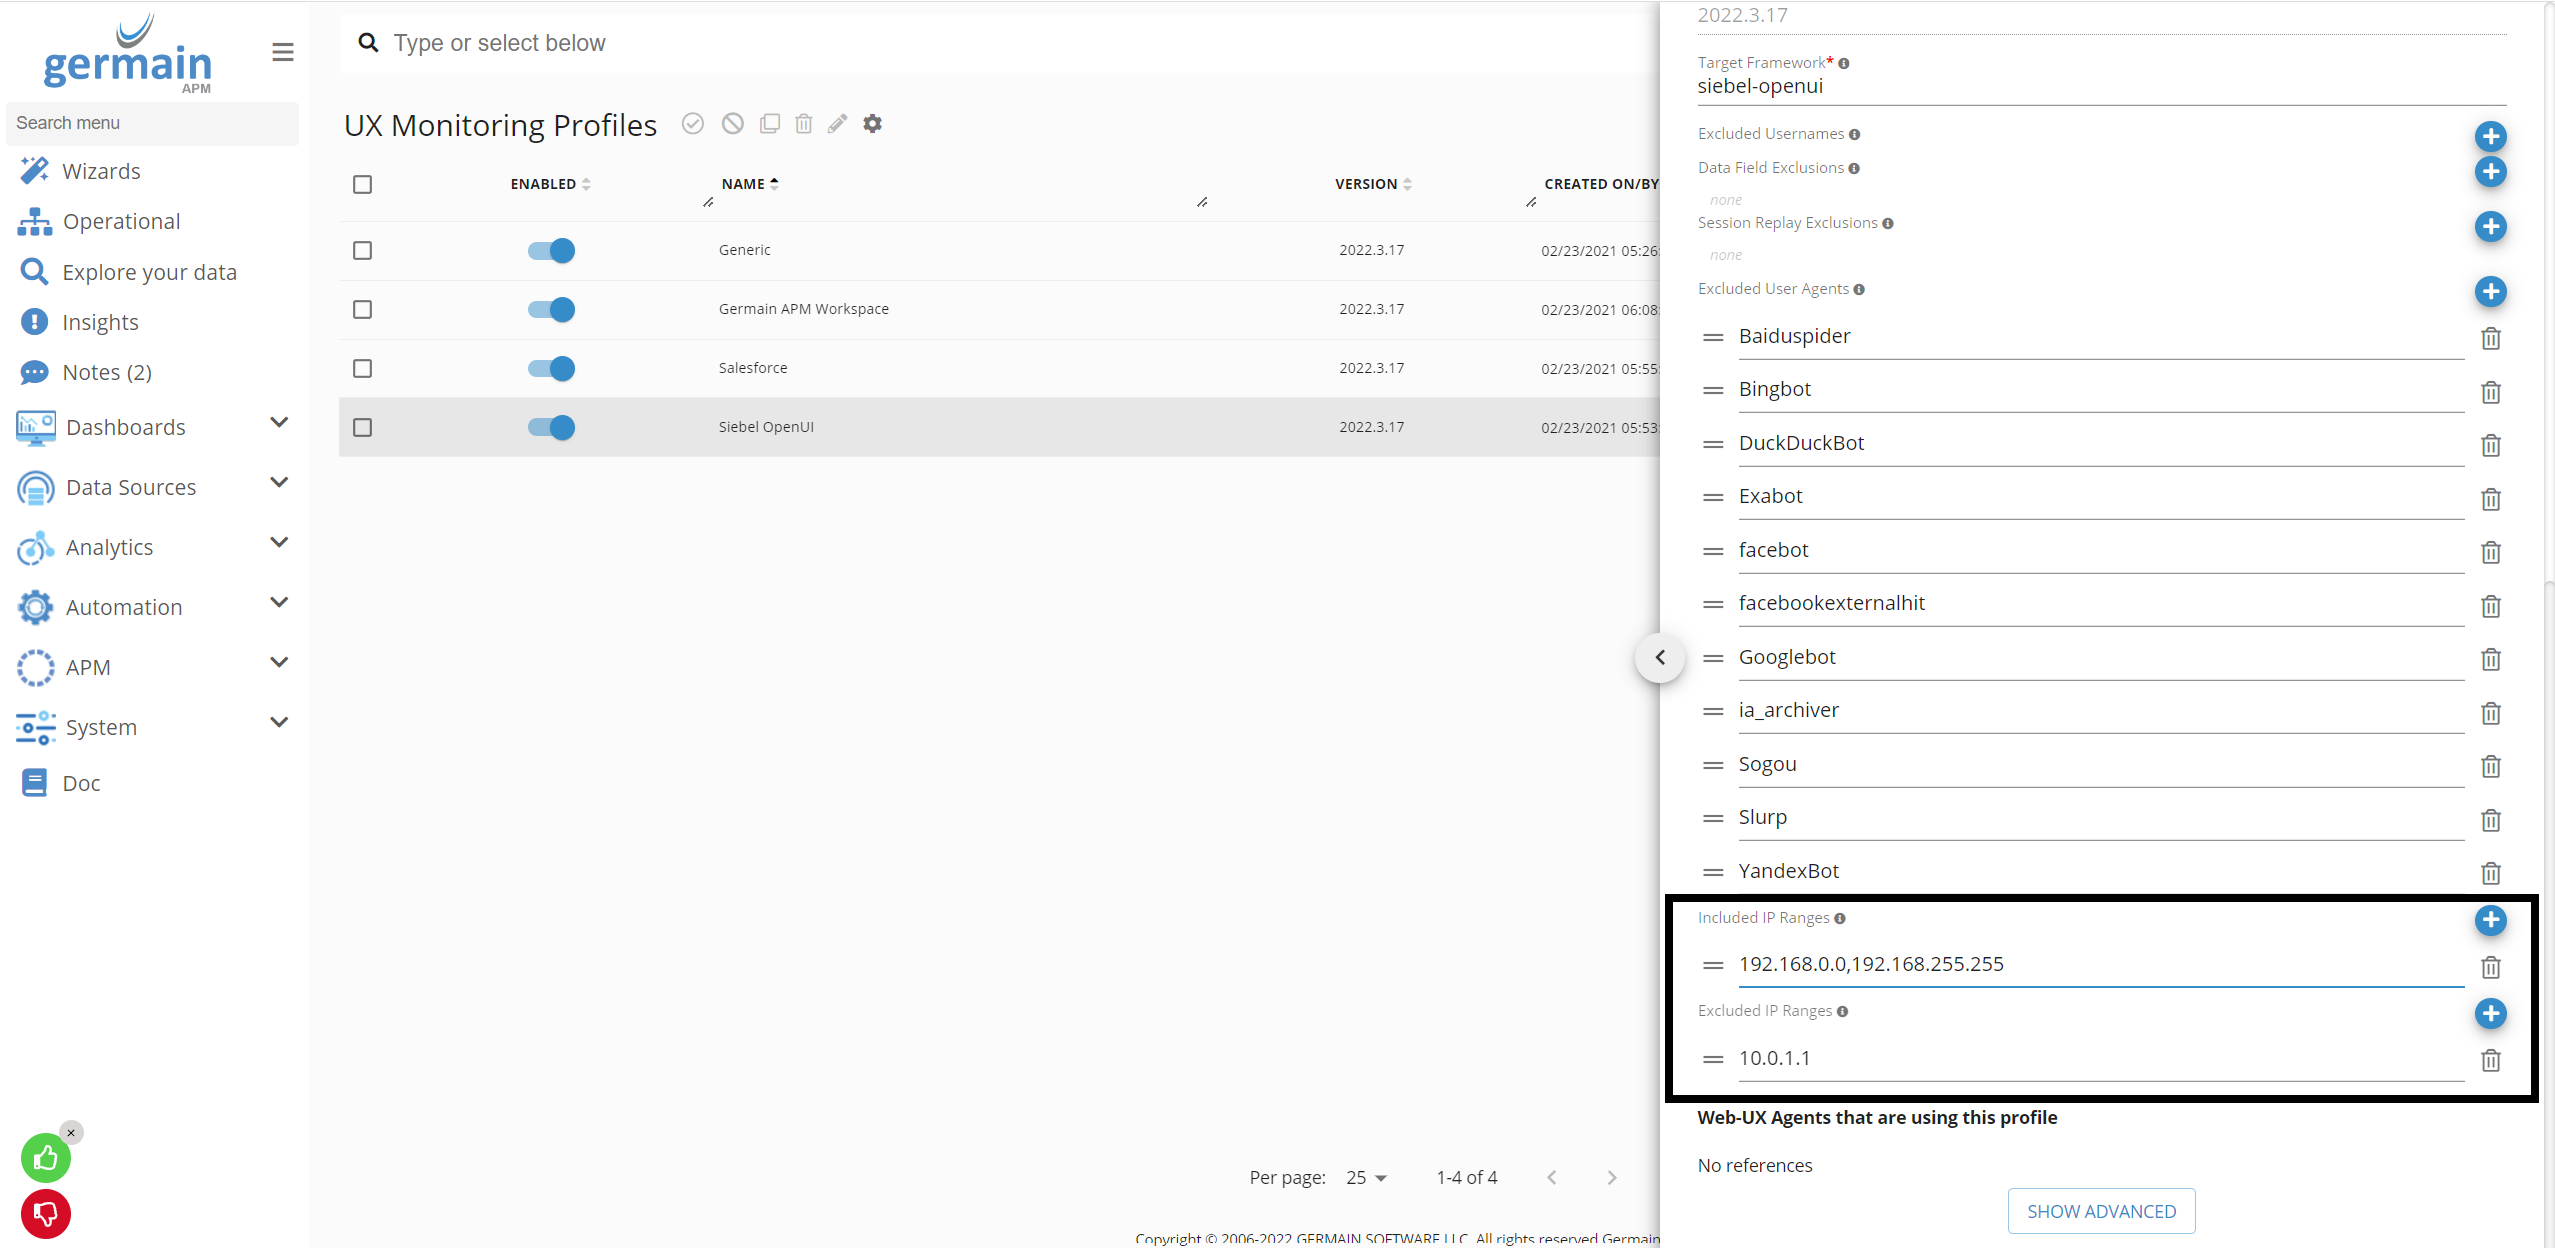
Blacklist and Whitelist IP Configuration for UX Monitoring Profile
Exclude User Names Configuration
You can disable User Monitoring for selected named users. Use this feature if you don’t want UX monitoring data from your automated or synthetic users.
Note: User Monitoring and Replay will be deployed for all users as it needs to extract the username first, but the monitoring will not start if the extracted user belongs to the Excluded Usernames list.
Configuration:
To configure User Exclusion, follow the steps below:
Go to Germain Workspace > Left Menu > Analytics > UX Monitoring Profiles
Select a profile
Add/Modify/Remove usernames under Excluded Usernames
The following example shows three users who are going to be excluded, and the User Monitoring data will not be collected for them.

Excluded Usernames Configuration
Exclude Headless Browsers Configuration
You can disable User Monitoring for all headless browsers . Use this feature if you don’t want UX monitoring data from your automated synthetic scenarios.
Configuration:
To configure, follow the steps below:
Go to Germain Workspace > Left Menu > Analytics > UX Monitoring Profiles
Select a profile
Enabled/Disable under Exclude Headless Browsers

Disable Session Replay for Headless Browsers via UX Profile - Germain UX
Phrases of Interest
Phrases of Interest can be used to track specific substrings or regular expressions across pages under a particular UX Monitoring Profile. In the example bellow, a new phrase of interest will be created to track discounts of an e-commerce site. First step is to find the expression that will be tracked and highlight it.
Once highlighted, by right clicking the selected area, a new popup window opens with two options regarding Phrases of Interest. By click Add text to Phrases-of-Interest, the highlighted expression will be added to the respective UX Monitoring Profile to be tracked from the next session onwards.
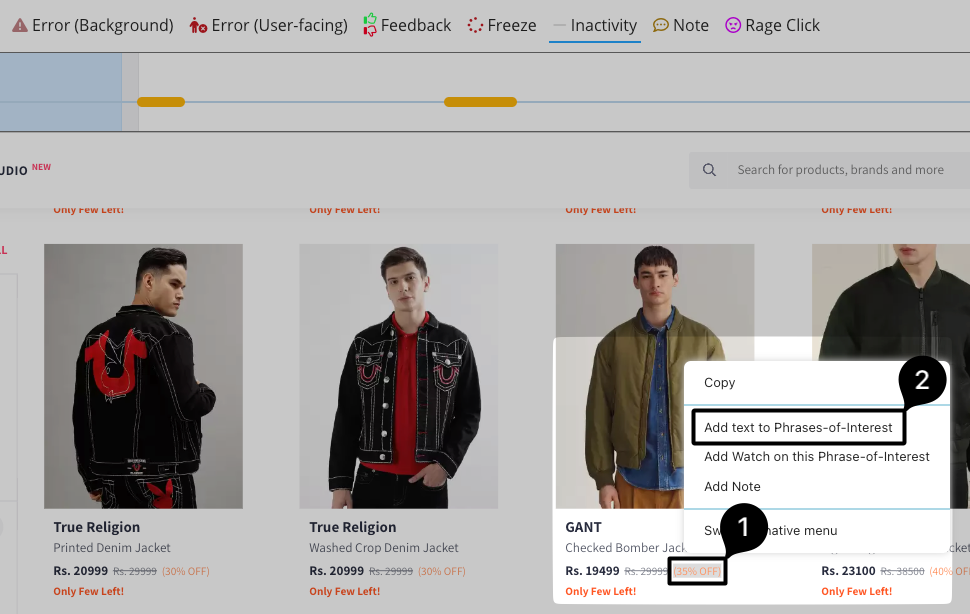
After being added, the phrase of interest will be available for the UX profile related to that website. You can find the respective configuration object going to Analytics > UX Monitoring Profiles > [Your Profile].
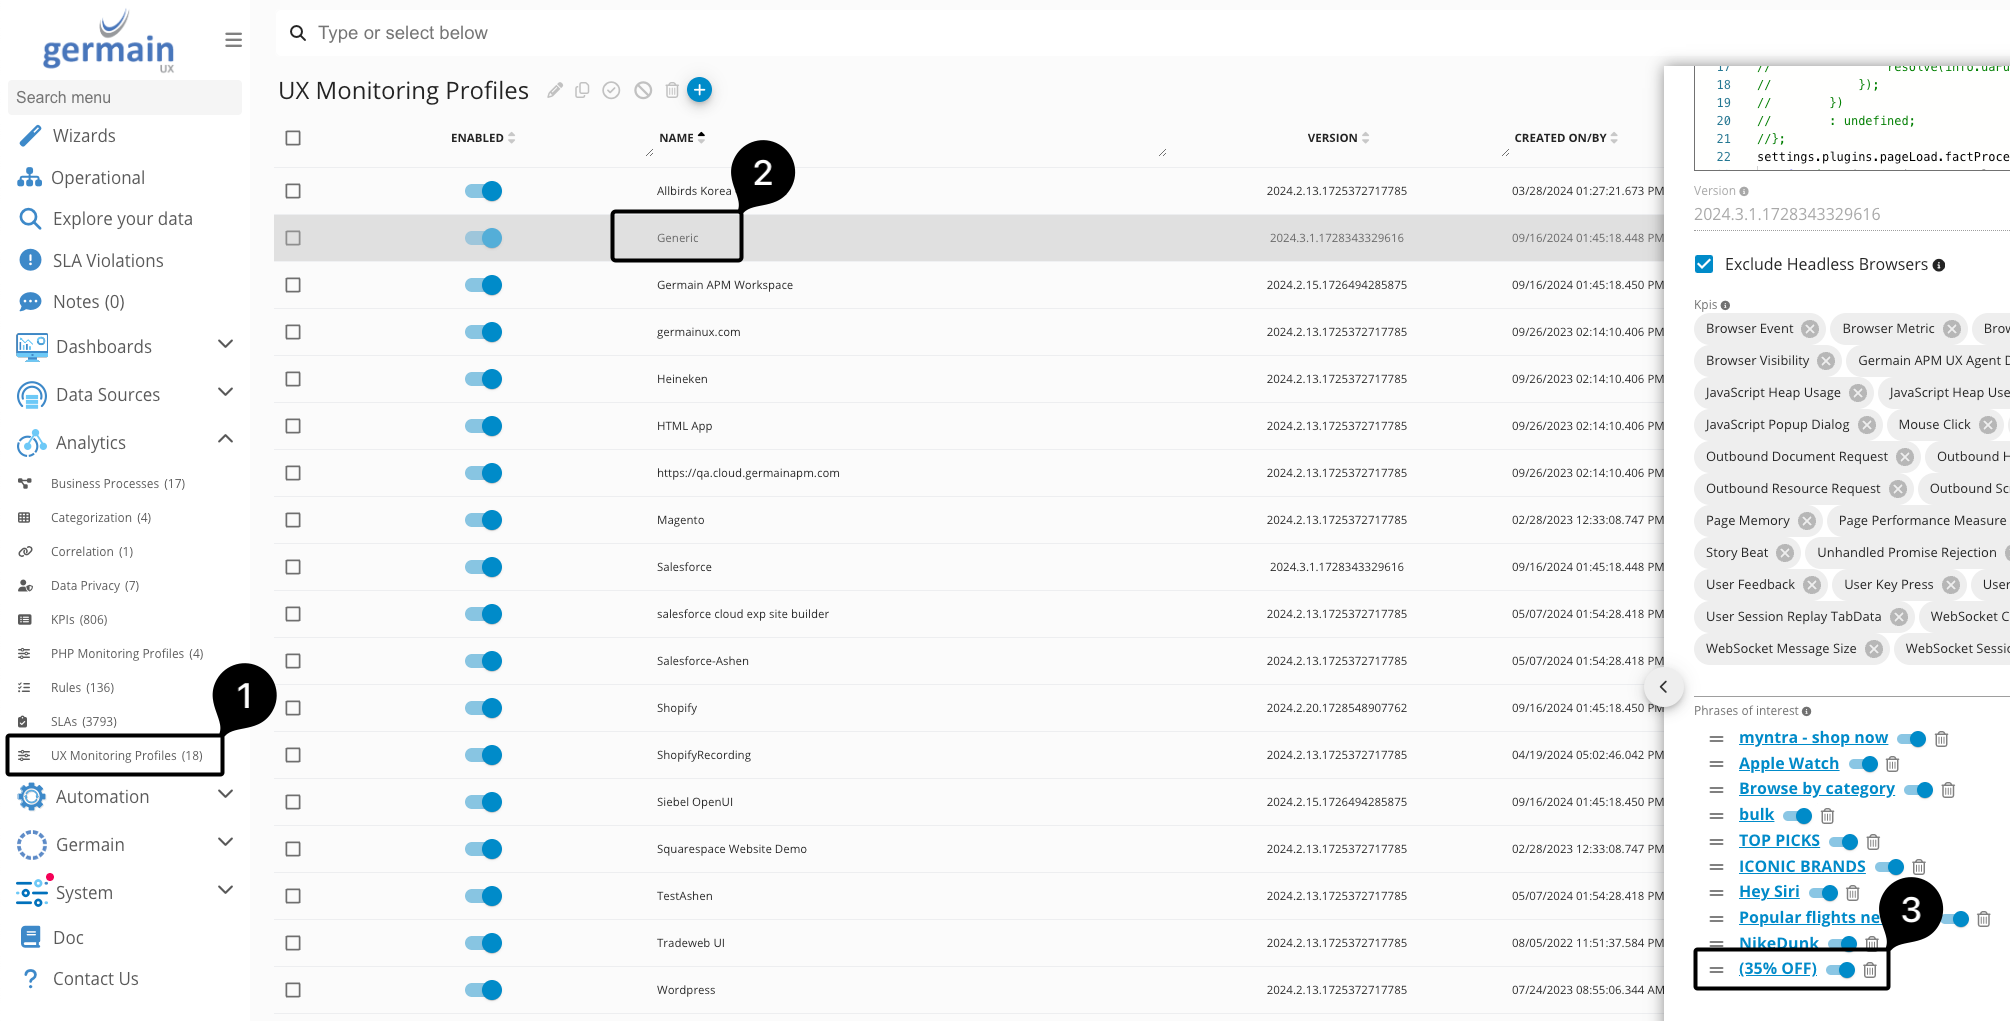
In the details, it is possible to see the substring we selected previously in the User Session Replay page.
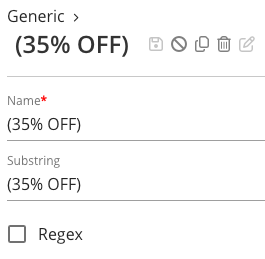
Phrase of Interest details - Germain UX
As it is currently configured, anytime the substring (35% OFF) appears in the screen, a new record will be created to the Phrase of Interest Appeared KPI, which can be found in Analytics > KPI > Phrase of Interest Appeared. The results will be shown such as seen bellow:
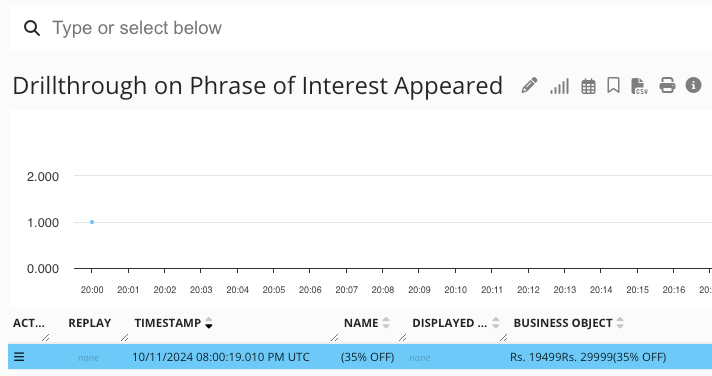
Discount tracked - Germain UX
It is even possible to make such filters more dynamic using regular expressions. For this, the tracked substring needs to be changed going to Analytics > UX Monitoring Profiles > [Your Profile] > [Phrase of Interest].

For this example, we will track discounts over 80% on the price, thus we checking the Regex checkbox to indicate our substring is a regular expression and setting our substring to (\([6-9][0-9]%\sOFF\)). Remember to save the changes.
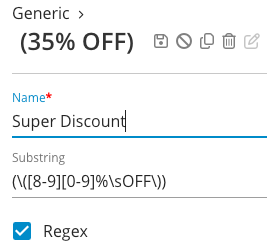
Regex Phrase of Interest - Germain UX
As expected, once a new session starts and that regular expression is found in the page, these records will be available in the Phrase of Interest Appeared KPI.
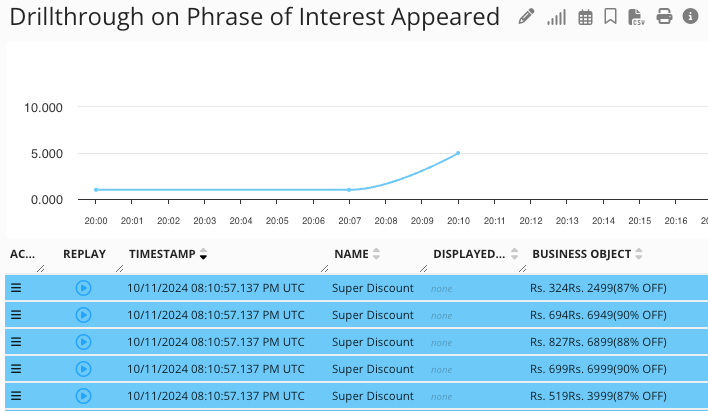
Regex Phrase of Interest results - Germain UX
Additionally it is possible to add a watch on the Phrase of Interest, so an email alert can be delivered either next time the phrase is seen in the website, every time the phrase is seen or every time the phrase is identified up to a certain date. The following are all the options available once you click the Add Watch on this Phrase-of-Interest option in User Session Replay.
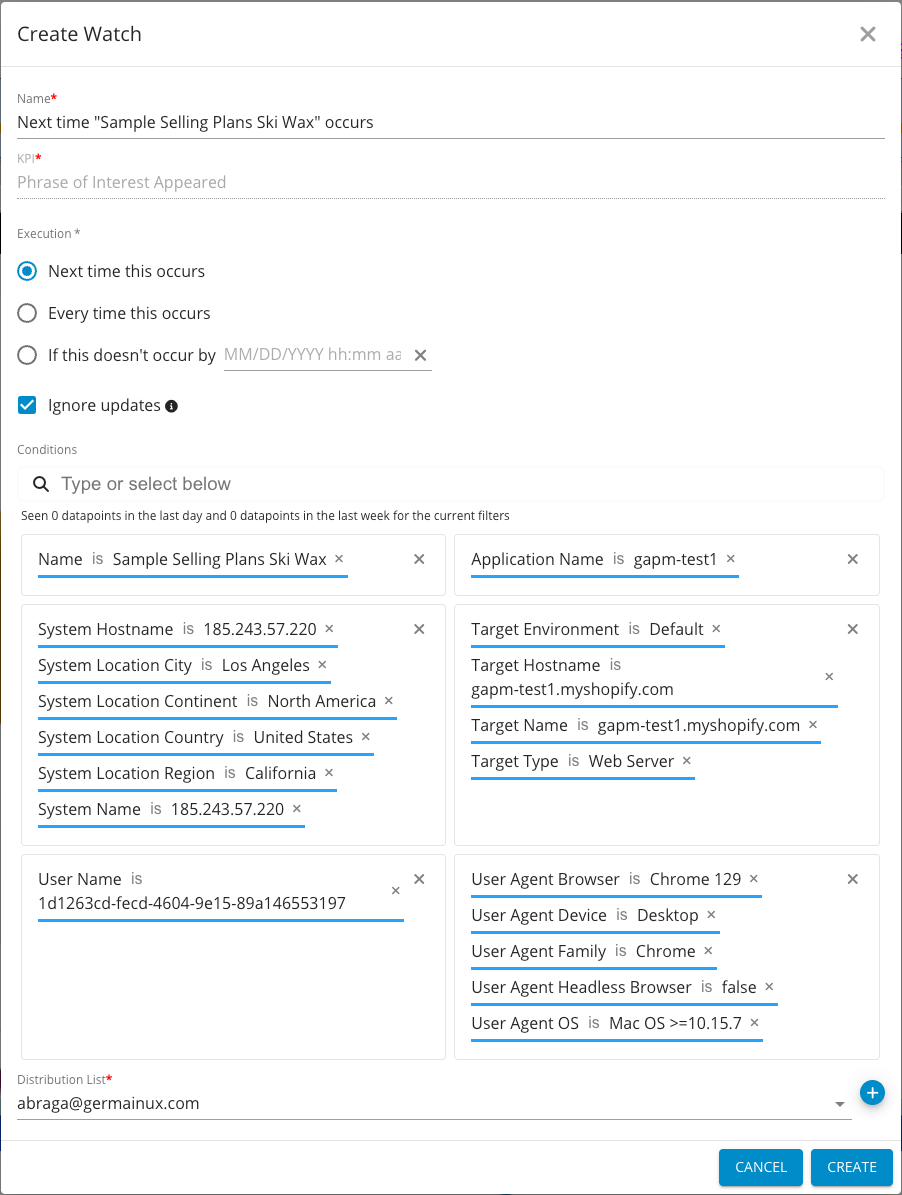
Create a watch for Phrase of Interest - Germain UX
Custom Insight / Custom Tab
Custom Insight or Custom Tab is one of several ways to quickly automate and find insights that matter to you.
For example, if you want to easily identify and highlight moments in the Session Replay Player when a user adds a product to their cart, Germain UX lets you create a Custom Tab. In this case, you could name the tab 'Add to Cart,' and it will be visible to all Germain users across all recorded sessions.

“Add to Cart” custom tab example - Germain UX
To add a new Custom Tab (i.e Custom Insight) in the Session Replay Player, a new object must be added in the UI configuration area of the system.
Log on to Germain UX Workspace > Left Menu > System > System Settings > UI Config.
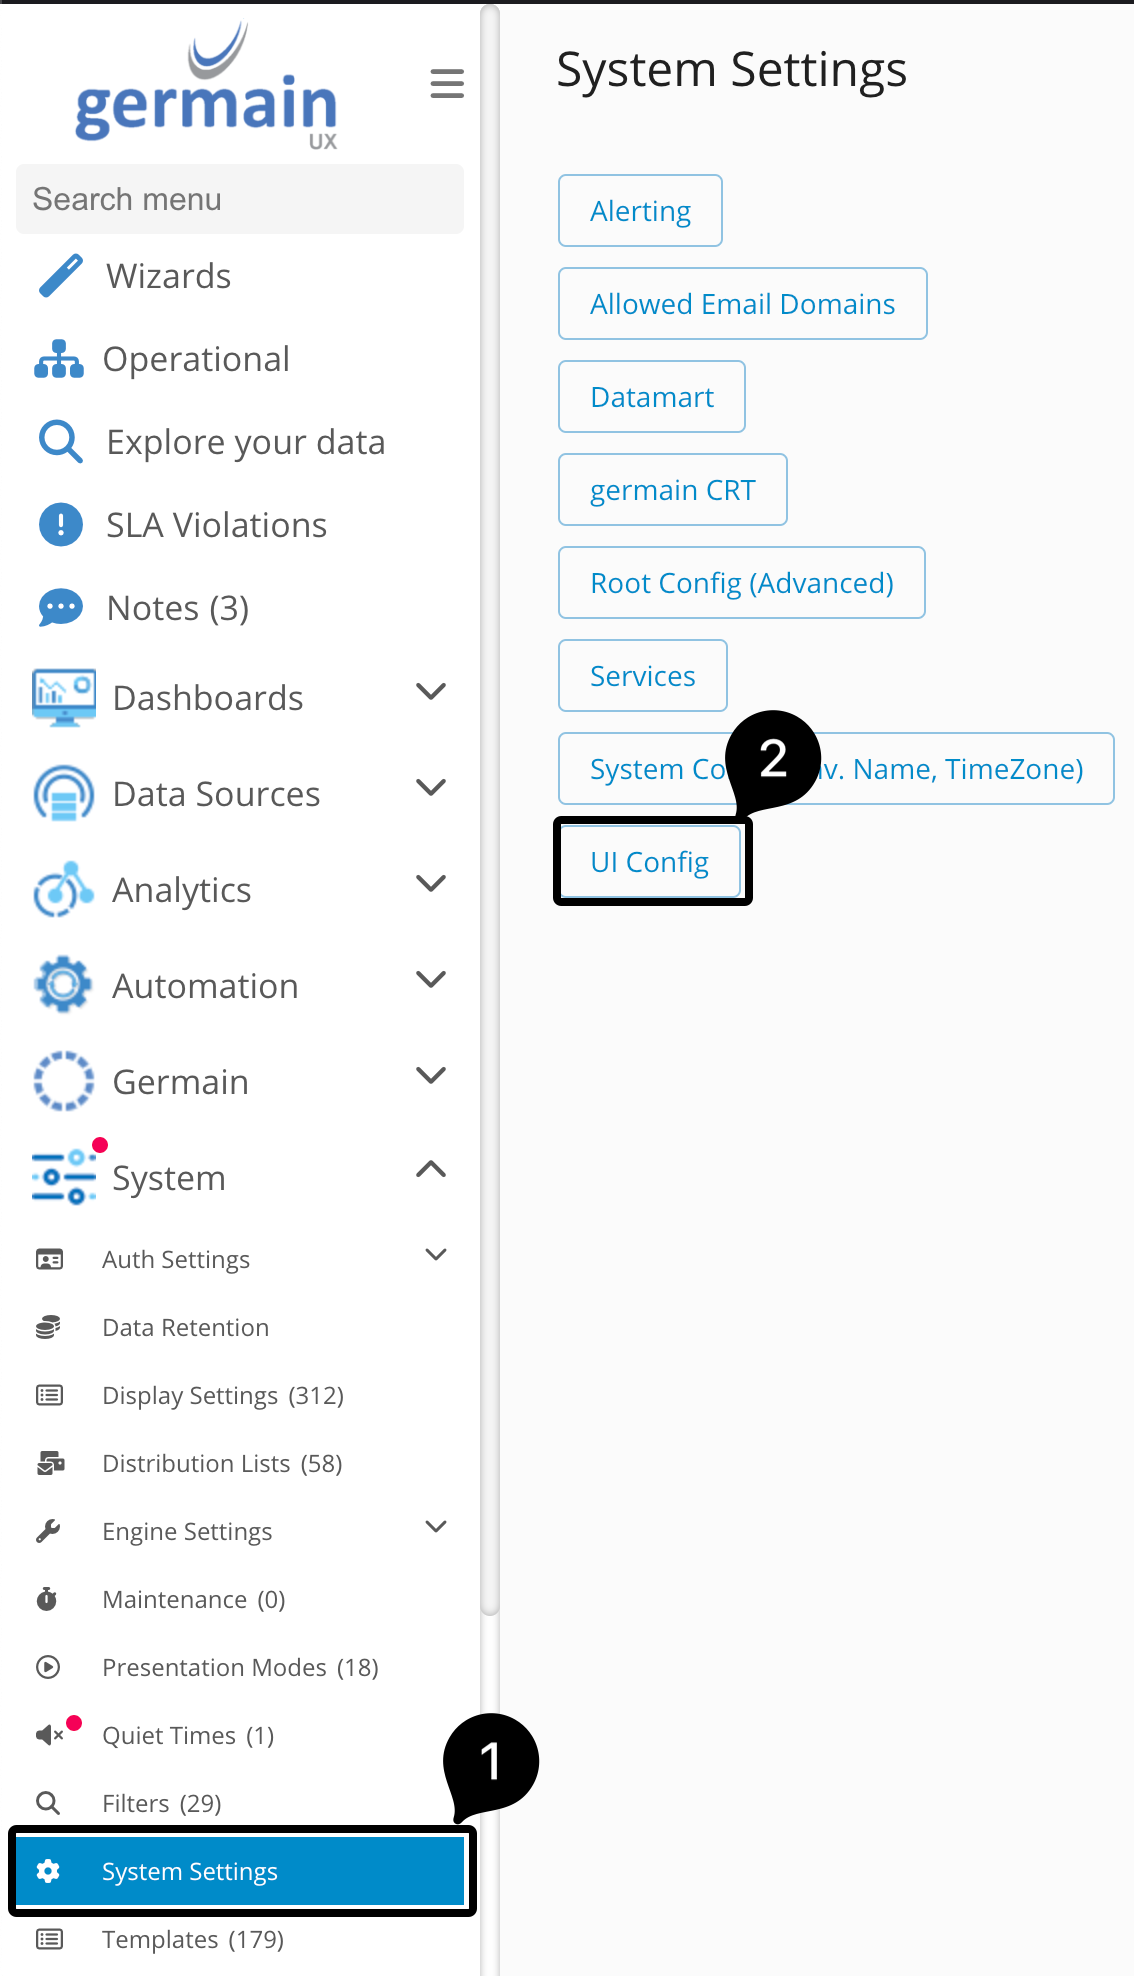
Add a Custom Tab via UI Config - Germain UX
A new page will then open, and in it navigate to rcaDashboards > User Session Replay > portlets > Replay of User Session > timelineEvents. At this stage, click the Add button to add a new configuration object.

Timeline Events - Germain UX
As an example, to track adding products in a cart, the following details will be inserted:
Name: Name of the configuration object. In this example this is Add to Cart.
targetFramework: UX Profile target framework (e.g Salesforce, Shopify, Generic). In this example this is shopify.
kpiName: Name of the KPI which tracks the action to monitor in the Replay Player. In this example this is Shopify Product Added to Cart.
kpiFilter: Filtering parameter for the KPI events. In this example this is name == 'Product Added'.
eventModel: JSON model containing necessary UX details (e.g Label, Font-Awesome Icon, Color). In this example this is {"label":"Add to Cart","tooltip":"Product added","color":"black","height":10,"icon":"fa-solid fa-cart shopping","zIndex":1,"timelinePosition":"above"}.
Once the details are fulfilled, click the Create button at the top-right corner of the page.

Timeline object creation - Germain UX
Voilà! A new “Add to Cart” Custom Tab is created. As a result, a “Cart” icon will appear on the timeline whenever a product is added to the cart.

Custom Tab/Insight in the timeline - Germain UX
