
🔧 Deploy Monitoring for WordPress
Deploy GermainUX monitoring for WordPress to analyze real-user experience, Session Replay, website performance, JavaScript errors, synthetic transactions, REST APIs, logs, and databases.
🌐 Deployment Options
|
Monitoring Requirement |
GermainUX Component |
|---|---|
|
Real User Monitoring and Session Replay |
RUM JS |
|
Advanced browser and JavaScript troubleshooting |
JS Profiler |
|
WordPress REST API monitoring |
Engine |
|
WordPress log monitoring |
Engine |
|
Database monitoring |
Engine |
|
Synthetic user monitoring |
RPA Bot Recorder and Engine |
📋 Prerequisites
Before deployment, identify:
|
Item |
|---|
|
WordPress website |
|
Website URL |
|
WordPress environment |
|
Production and non-production domains |
|
WordPress version |
|
Theme |
|
Important plugins |
|
Hosting architecture |
|
REST API access |
|
Log access |
|
Database access |
|
Required privacy and consent controls |
Confirm that:
|
Check |
|---|
|
An authorized administrator can modify the WordPress website. |
|
Browser traffic can reach GermainUX. |
|
Required monitoring domains are allowed. |
|
Sensitive pages and fields are identified. |
|
Monitoring permissions are approved. |
🔧 1. Open the WordPress Wizard
Go to:
Germain Workspace > Left Menu > Wizards > WordPress
Start the WordPress Wizard.
⚙️ 2. Configure the Application
Set:
|
Setting |
|---|
|
Application Name |
|
Website URL |
Use a descriptive application name that identifies the environment.
For example:
Corporate Website - WordPress - Production
✅ 3. Complete the Wizard
Complete the WordPress Wizard.
The Wizard generates the appropriate UX Monitoring Profile and provides deployment instructions.
Supported deployment methods include:
|
Method |
|---|
|
Theme configuration |
|
Script tag injection |
|
JavaScript code snippet |
Choose the option appropriate for the WordPress architecture and deployment process.
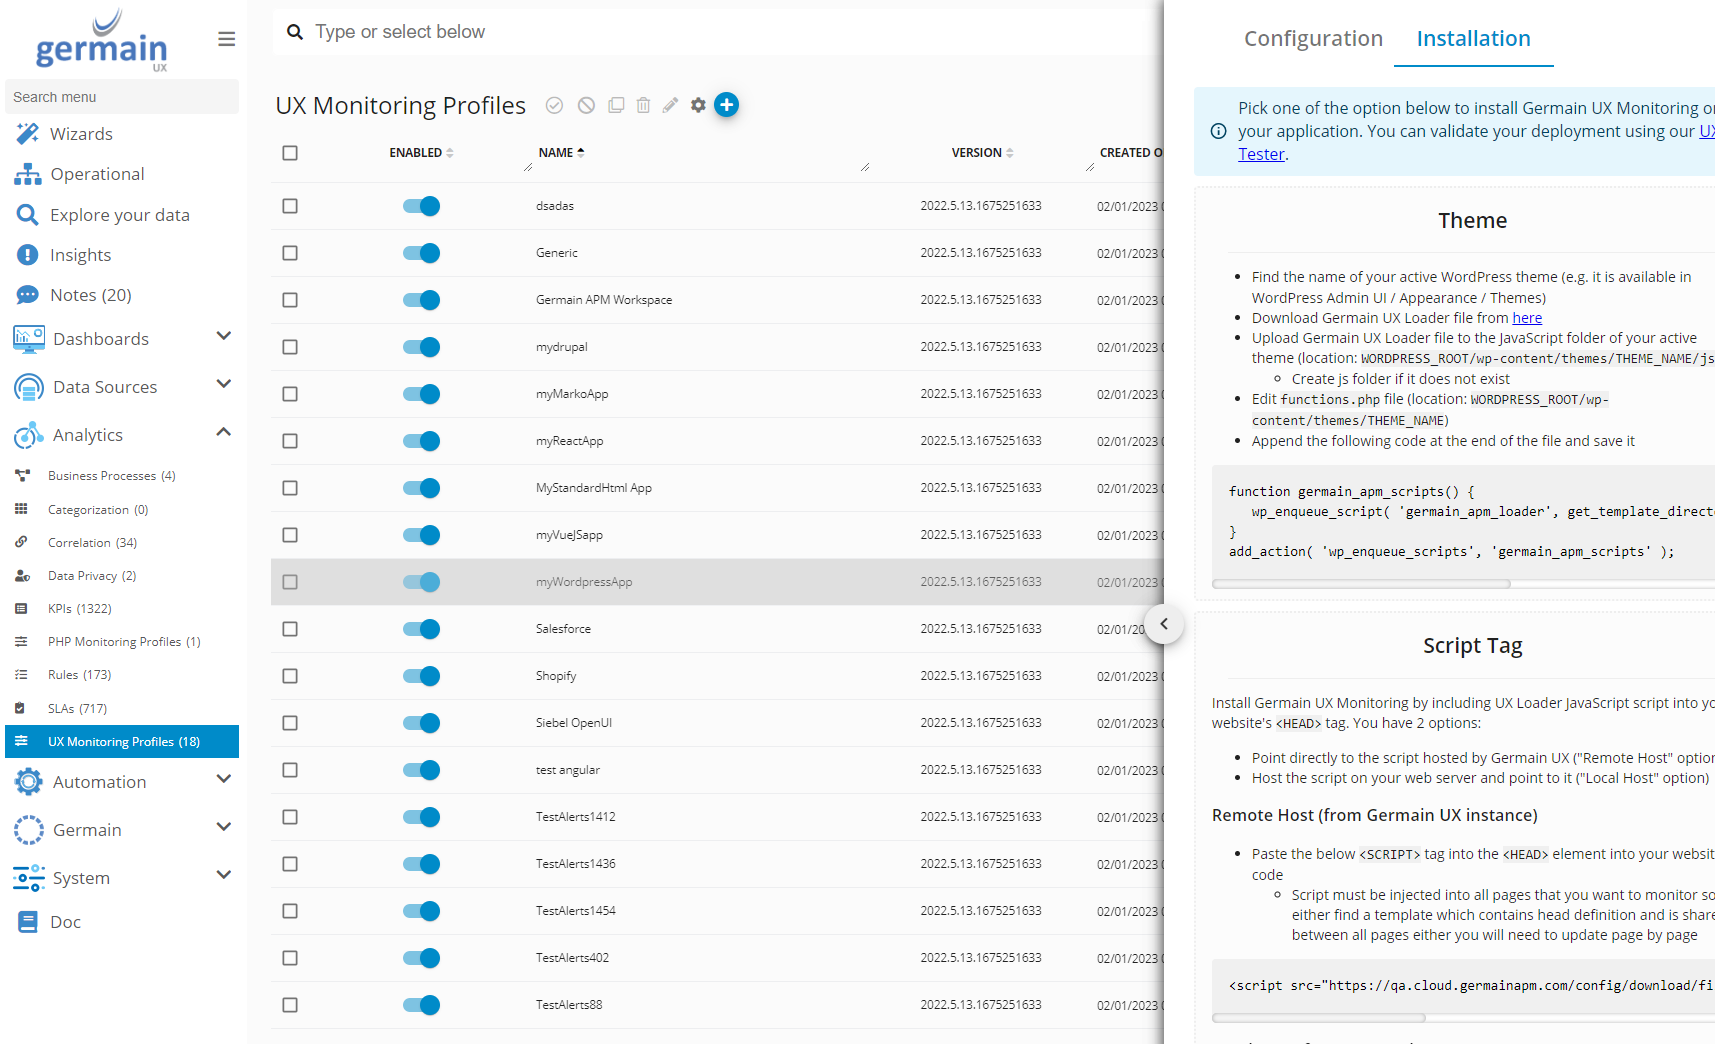
🚀 4. Deploy via Theme Configuration
Use theme configuration when GermainUX monitoring should be inserted through the WordPress theme.
Follow the exact instructions generated by the WordPress Wizard.
Use a child theme or another update-safe mechanism when appropriate so future theme updates do not remove the monitoring configuration.
After deployment:
-
Save the theme changes.
-
Clear applicable caches.
-
Reload the website.
-
Verify that GermainUX RUM JS loads.
🔗 5. Deploy via Script Tag Injection
Use script-tag injection when monitoring is deployed independently of the WordPress theme code.
Follow the script-tag instructions generated by the Wizard.
The monitoring script may be configured for local or remote loading depending on the generated deployment configuration.
Load GermainUX early enough in the page lifecycle to capture the required navigation, performance, and user activity.
📄 6. Deploy via JavaScript Code Snippet
Use the JavaScript snippet option when GermainUX initialization is managed through an approved WordPress customization or script-management mechanism.
Follow the exact snippet generated for the selected UX Monitoring Profile.
Do not copy monitoring configuration from another WordPress application or environment.
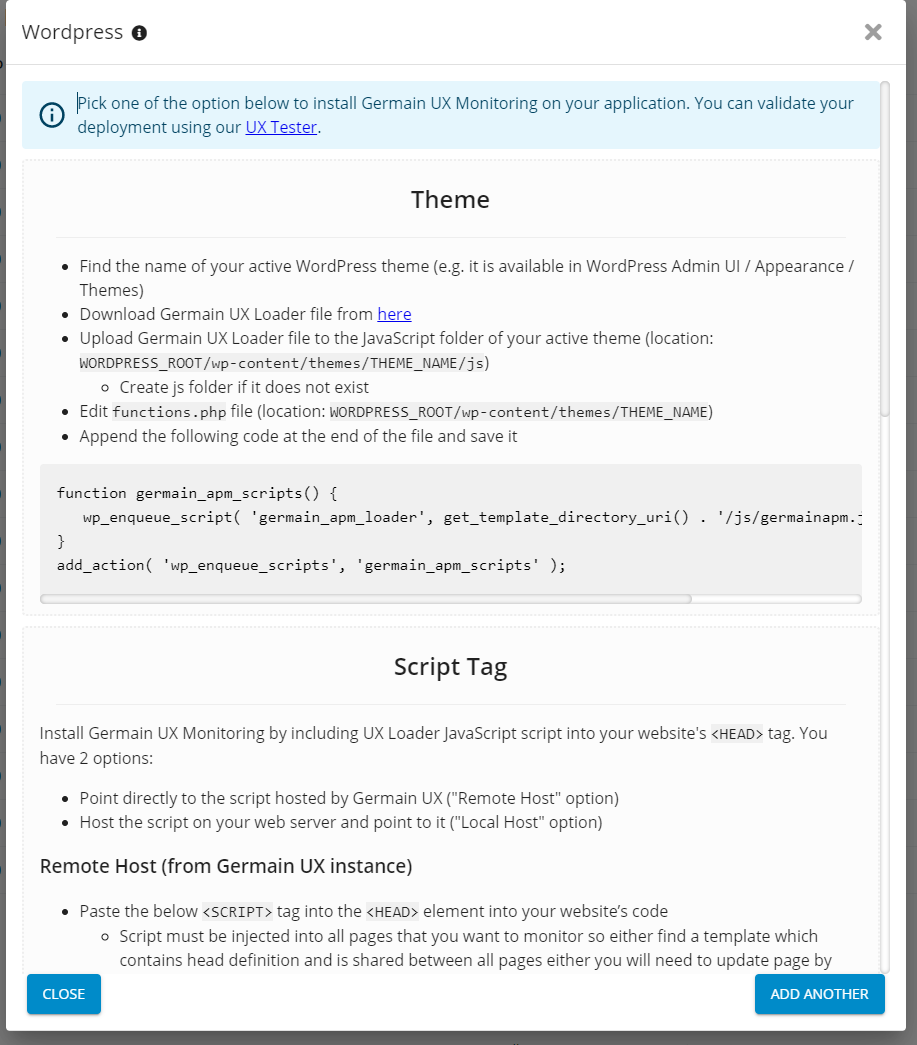
🕒 7. Retrieve Deployment Instructions Later
You can reopen the deployment instructions after completing the Wizard.
Go to:
Germain Workspace > Settings > Analytics > UX Monitoring Profiles
Select the UX Monitoring Profile created for WordPress.
Select:
Installation
in the Configuration Editor.
🧹 8. Clear Caches
After deploying or updating monitoring, clear applicable:
|
Cache Type |
|---|
|
WordPress cache |
|
CDN cache |
|
Optimization-plugin cache |
|
Reverse-proxy cache |
|
Browser cache |
Then verify that the current RUM JS configuration loads.
👀 9. Validate Real User Monitoring
Open the published WordPress website.
Perform representative activity such as:
-
Open the homepage.
-
Navigate between pages.
-
Click important controls.
-
Submit an approved test form.
-
Execute a representative workflow.
Verify that GermainUX receives:
|
Data |
|---|
|
Sessions |
|
Page views |
|
Navigation |
|
User interactions |
|
Performance data |
|
Network requests |
|
JavaScript errors |
🎥 10. Validate Session Replay
When Session Replay is enabled:
-
Perform a test session.
-
Locate the session in GermainUX.
-
Open Session Replay.
-
Verify the expected activity.
-
Confirm sensitive data is masked or excluded.
⚙️ 11. Deploy JS Profiler — Optional
Deploy GermainUX JS Profiler when deeper browser analysis is required.
Use it to investigate:
|
Scenario |
|---|
|
JavaScript errors |
|
Slow functions |
|
Browser processing |
|
Network requests |
|
Theme behavior |
|
Plugin behavior |
|
Third-party scripts |
|
Browser freezes |
Validate profiling in a controlled environment before broad production use when appropriate.
⚙️ 12. Deploy REST API Monitoring — Optional
Deploy a GermainUX Engine when WordPress REST API monitoring is required.
Before deployment, identify:
|
Parameter |
|---|
|
API endpoint |
|
HTTP method |
|
Authentication |
|
Credentials or token |
|
Request parameters |
|
Expected HTTP status |
|
Expected response |
|
Timeout |
|
Monitoring frequency |
Use read-only API operations when they satisfy the monitoring requirement.
🗄️ 13. Deploy WordPress Log Monitoring — Optional
When logs are accessible, configure GermainUX Engine to monitor relevant log sources.
Examples include:
|
Log Type |
|---|
|
WordPress debug logs |
|
PHP logs |
|
Web-server logs |
|
Plugin logs |
|
Integration logs |
Ensure the Engine has appropriate read permissions.
🗄️ 14. Deploy Database Monitoring — Optional
When authorized access is available, deploy GermainUX monitoring for the database supporting WordPress.
Depending on the environment, this may be:
|
Database |
|---|
|
MySQL |
|
MariaDB |
Verify:
|
Check |
|---|
|
Network connectivity |
|
Credentials |
|
Permissions |
|
Database monitoring configuration |
🏭 15. Deploy Infrastructure Monitoring — Optional
When hosting infrastructure is accessible, deploy applicable monitoring for:
|
Area |
|---|
|
Operating system |
|
Web server |
|
PHP |
|
CPU |
|
Memory |
|
Disk |
|
Network |
|
Containers |
|
Cloud infrastructure |
🤖 16. Deploy Synthetic Monitoring — Optional
Use GermainUX RPA Bot Recorder to record critical WordPress scenarios.
Examples include:
-
Open Website → Navigate → Verify Critical Page
-
Open Website → Submit Test Form → Verify Confirmation
-
Open Website → Login → Execute Approved Workflow → Verify Result
Use dedicated test accounts and safe test data.
✅ 17. Validate the Deployment
Confirm:
|
Validation |
|---|
|
RUM JS loads successfully. |
|
RUM JS is deployed only once. |
|
Correct application is assigned. |
|
Correct environment is assigned. |
|
User sessions reach GermainUX. |
|
Navigation is captured. |
|
User interactions are captured. |
|
Performance data is available. |
|
JavaScript errors are captured. |
|
Session Replay works when enabled. |
|
Sensitive information is protected. |
|
JS Profiler works when deployed. |
|
REST API monitoring works when configured. |
|
Log monitoring works when configured. |
|
Database monitoring works when configured. |
|
Synthetic monitoring works when configured. |
Once deployment is validated, continue with Configure Monitoring for WordPress.
🔧 Deploy Monitoring for WordPress
Deploy GermainUX monitoring for a WordPress website to capture real-user experience, Session Replay, page performance, errors, user journeys, application availability, infrastructure health, and synthetic transactions.
This page covers WordPress websites and administrative interfaces. For online-store transactions and commerce-specific events, use the separate WooCommerce Monitoring documentation.
🌐 Deployment options
|
Monitoring requirement |
GermainUX component |
Deployment location |
|---|---|---|
|
Real User Monitoring and Session Replay |
Public WordPress pages or the WordPress administration interface |
|
|
JavaScript and browser diagnostics |
Supported administrator, developer, or support browsers |
|
|
Application, server, database, API, and log monitoring |
A server with access to the monitored WordPress environment |
|
|
Synthetic user journeys |
GermainUX RPA Bot Recorder and Engine |
Recorder browser and GermainUX Engine |
|
Mobile application monitoring |
Native mobile application, when applicable |
⚙️ Deployment workflow
|
Step |
Action |
|---|---|
|
1 |
Identify the WordPress websites, environments, domains, user journeys, and administrative interfaces to monitor. |
|
2 |
Run the WordPress wizard in GermainUX. |
|
3 |
Configure the application, website URL, UX monitoring profile, privacy rules, and bot exclusions. |
|
4 |
Deploy GermainUX RUM JS on the required WordPress pages. |
|
5 |
Verify Real User Monitoring, errors, performance data, and Session Replay. |
|
6 |
Configure WordPress application, server, database, API, and log monitoring when required. |
|
7 |
Deploy the JS Profiler when deeper browser-side diagnostics are needed. |
|
8 |
Record and deploy synthetic scenarios for proactive availability and workflow monitoring. |
|
9 |
Configure KPIs, SLAs, dashboards, alerts, analytics, and approved automated actions. |
✨ Run the WordPress wizard
In GermainUX:
-
Go to Workspace > Settings > Wizards.
-
Select WordPress.
-
Enter the requested configuration.
|
Setting |
Description |
|---|---|
|
Application name |
Name used to identify the WordPress website in GermainUX |
|
Website URL |
Public or internal WordPress URL beginning with |
|
Environment |
Production, staging, test, development, or another applicable environment |
|
UX monitoring profile |
Monitoring configuration applied to the website |
|
Privacy configuration |
Masking, anonymization, exclusion, and recording rules |
|
Bot and crawler handling |
Determines whether automated traffic is collected or excluded |
|
Allowed domains |
WordPress domains and subdomains authorized to use the monitoring profile |
Complete the wizard and review the generated RUM JS deployment instructions.
🔍 Deploy Real User Monitoring and Session Replay
Deploy GermainUX RUM JS on every WordPress page that must be monitored. The script should load as early as practical in the page <head> so that initial page activity and performance can be captured.
Choose the deployment method supported by the WordPress environment.
📑 WordPress plugin or header-injection mechanism
Use an approved WordPress plugin or site-management mechanism that can insert JavaScript into the global page header.
-
Sign in to WordPress as an authorized administrator.
-
Open the approved header, script, or code-injection configuration.
-
Add the RUM JS snippet generated by GermainUX to the
<head>section. -
Apply it to the required pages or site templates.
-
Save and publish the change.
-
Clear applicable WordPress, CDN, proxy, and browser caches.
Use a plugin approved by the organization. GermainUX does not require a specific third-party WordPress plugin for script insertion.
🎨 WordPress theme
The script can be added to the active theme when changes are managed through an appropriate development and release process.
-
Create or use a WordPress child theme.
-
Add the GermainUX RUM JS snippet through the child theme’s supported header or script-enqueue mechanism.
-
Deploy the change using the organization’s normal release process.
-
Clear applicable caches.
-
Confirm that the script remains available after theme updates.
Avoid directly modifying a third-party parent theme because a theme update can overwrite the change.
🏷️ Google Tag Manager
When Google Tag Manager is already authorized for the website, deploy RUM JS using Google Tag Manager.
-
Create a Custom HTML tag containing the GermainUX RUM JS snippet.
-
Configure the tag to run on the required WordPress pages.
-
Review consent and trigger requirements.
-
Preview and validate the tag.
-
Publish the container.
🔒 WordPress administration interface
If monitoring is required for /wp-admin, deploy RUM JS specifically within the administration interface using an approved WordPress customization.
Limit collection to authorized administrators and contributors. Configure privacy rules carefully because administrative pages can contain user details, draft content, configuration values, and operational data.
🛡️ Content Security Policy
If the WordPress website uses a Content Security Policy, authorize only the GermainUX origins required to:
-
Download GermainUX RUM JS
-
Send monitoring data to GermainUX
-
Load any enabled feedback or supporting resources
Use HTTPS and the most restrictive CSP directives supported by the deployment. Do not authorize unrelated domains or broad wildcards.
📝 Consent, privacy, and Session Replay
Before enabling Session Replay, configure the appropriate compliance, privacy, and security controls.
Depending on the website and applicable requirements, configure:
|
Control |
|---|
|
Consent-dependent activation |
|
Text and input masking |
|
User and visitor anonymization |
|
Page, element, and field exclusions |
|
URL and query-parameter filtering |
|
Sensitive-content exclusions |
|
Bot and crawler filtering |
|
Data retention |
|
Role-based access to replay data |
Exclude passwords, authentication tokens, payment details, personal information, unpublished content, and sensitive administrative data from collection.
🖥️ Application and infrastructure monitoring
Real User Monitoring shows what visitors and administrators experience in the browser. Deploy the GermainUX Engine when monitoring must extend to the supporting application and infrastructure.
Depending on the WordPress hosting architecture and available access, GermainUX can monitor:
|
Area |
Examples |
|---|---|
|
Website availability |
HTTP availability, response time, status code, redirects, and certificate validity |
|
WordPress APIs |
WordPress REST API availability, response time, status, and errors |
|
Web server |
Apache or NGINX availability, performance, connections, errors, and access logs |
|
PHP |
PHP processes, response time, resource usage, errors, and PHP-FPM health when exposed |
|
Database |
MySQL or MariaDB availability, connections, query performance, capacity, and errors |
|
Logs |
WordPress debug logs, PHP logs, web-server logs, database logs, and operating-system logs |
|
Infrastructure |
CPU, memory, disk, filesystem, network, process, container, and cloud-resource health |
|
Scheduled activity |
WordPress cron execution and customer-defined scheduled-job checks |
|
External dependencies |
DNS, CDN, authentication, email, APIs, and other services used by the website |
Use File and Log Monitoring for accessible WordPress, PHP, and web-server logs.
Monitoring depth depends on the hosting provider, deployment architecture, access permissions, enabled APIs, and available logs and metrics. Managed WordPress services may not expose the underlying server, database, or filesystem.
🐛 JavaScript diagnostics
Deploy the GermainUX JS Profiler on authorized browsers when deeper analysis is required for:
-
JavaScript exceptions
-
Browser console events
-
Slow or failed network requests
-
Third-party scripts
-
Theme or plugin conflicts
-
Browser freezes
-
Long-running JavaScript activity
-
Client-side performance bottlenecks
The JS Profiler is typically deployed to administrator, developer, QA, or support browsers rather than every public visitor’s browser.
🤖 Synthetic monitoring
Use the GermainUX RPA Bot Recorder to record representative WordPress scenarios, such as:
-
Open the home page
-
Navigate through primary pages
-
Search the website
-
Submit a contact or lead form
-
Sign in to a member portal
-
Access a protected page
-
Sign in to the WordPress administration interface
-
Publish or update content in a controlled test environment
Deploy the recorded scenarios through a GermainUX Engine. Configure their execution frequency, locations, credentials, validation steps, timeouts, alerts, and maintenance windows.
Avoid performing production-changing administrative actions unless the scenario uses controlled test data and has been explicitly approved.
✅ Validate the deployment
After deploying the required components:
-
Open the monitored WordPress website in a supported browser.
-
Accept or decline consent according to the configured test case.
-
Navigate through several pages and perform representative actions.
-
Confirm that RUM JS loads successfully.
-
Confirm that monitoring requests reach the GermainUX environment.
-
Verify that sessions, pages, clicks, performance data, and errors appear in GermainUX.
-
Open a Session Replay and confirm that it reconstructs the interaction correctly.
-
Verify that sensitive fields and content are masked or excluded.
-
Test the website on desktop and mobile layouts.
-
Confirm that caching, optimization, consent, and security plugins do not prevent collection.
-
Validate application, infrastructure, log, and synthetic data when those capabilities are enabled.
📁 Deployment and configuration
|
For your WordPress environment |
|---|
|
Review WordPress Monitoring. |
|
Run the WordPress wizard from Workspace > Settings > Wizards. |
|
Deploy GermainUX RUM JS through an approved WordPress integration, child theme, or tag-management platform. |
|
Use Google Tag Manager deployment when tag management is the selected deployment method. |
|
Configure Real User Monitoring, Session Replay, consent, privacy, masking, exclusions, retention, and bot filtering. |
|
Deploy the GermainUX JS Profiler for deeper browser and JavaScript diagnostics. |
|
Deploy the GermainUX Engine for APIs, logs, servers, databases, infrastructure, integrations, synthetic monitoring, and automation. |
|
Configure File and Log Monitoring for accessible WordPress, PHP, web-server, and infrastructure logs. |
|
Deploy the GermainUX RPA Bot Recorder to create synthetic WordPress scenarios. |
|
Configure automated analytics, outlier detection, KPIs, SLAs, dashboards, and alerts. |
|
Configure approved automated actions when diagnostic or remediation workflows are required. |
|
Define maintenance windows for planned WordPress, plugin, theme, server, and infrastructure changes. |
Component requirements and feature availability depend on the WordPress architecture, hosting provider, consent configuration, security controls, available APIs, infrastructure access, and desired monitoring depth.
ℹ️ Get More Information
GermainUX can help determine which monitoring, analytics and automation capabilities are appropriate for your Oracle Siebel CRM environment. Contact GermainUX Support.
Component: Engine, JS Profiler, Mobile App, RPA Bot Recorder, RUM JS
Feature Availability: 2017.2 or later