
📡 Deploy Monitoring for Webflow
Deploy GermainUX monitoring for a Webflow website.
The Webflow Wizard creates the required UX Monitoring Profile and provides the installation instructions needed to inject GermainUX monitoring into the Webflow site.
⚙️ Monitoring Components
Depending on the required coverage, Webflow monitoring can use:
|
Monitoring Area |
GermainUX Component |
|---|---|
|
Real User Monitoring |
RUM JS |
|
Session Replay |
RUM JS |
|
Browser performance |
RUM JS |
|
JavaScript errors |
RUM JS |
|
Network monitoring |
RUM JS |
|
Advanced JavaScript troubleshooting |
JS Profiler |
|
Synthetic workflow monitoring |
RPA Bot Recorder |
|
REST API monitoring |
Engine |
|
HTTP availability monitoring |
Engine |
Deploy only the components required for your monitoring objectives.
📋 Prerequisites
Before deployment, confirm:
|
Requirement |
Details |
|---|---|
|
Access to Germain Workspace |
You have access to Germain Workspace. |
|
Webflow website URL |
You know the Webflow website URL. |
|
Modify Webflow configuration |
You can modify the Webflow site configuration required to deploy the generated monitoring code. |
|
Network connectivity |
Browsers accessing the Webflow site can communicate with GermainUX. |
|
Privacy and security policies |
Required privacy and security policies have been defined. |
|
Target environments/domains |
You know which environments or domains should be monitored. |
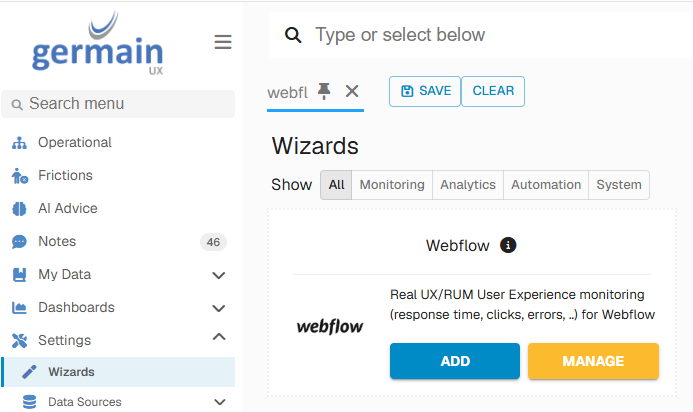
1️⃣ Open the Webflow Wizard
Go to:
Germain Workspace > Left Menu > Wizards > Webflow
Start the Webflow Wizard.
2️⃣ Configure the Application
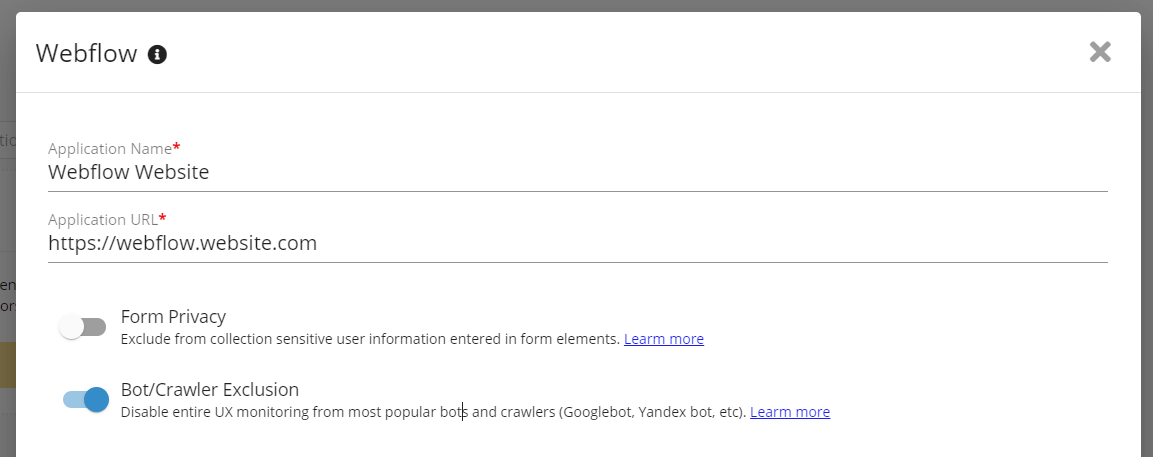
Enter the requested application information, including:
|
Field |
Example / Notes |
|---|---|
|
Application Name |
Application Name |
|
Website URL |
Website URL |
Use a descriptive application name.
For example:
Corporate Website - Webflow - Production
3️⃣ Complete the Wizard
Continue through the Webflow Wizard.
GermainUX creates the applicable UX Monitoring Profile and displays the deployment instructions in the Wizard summary.
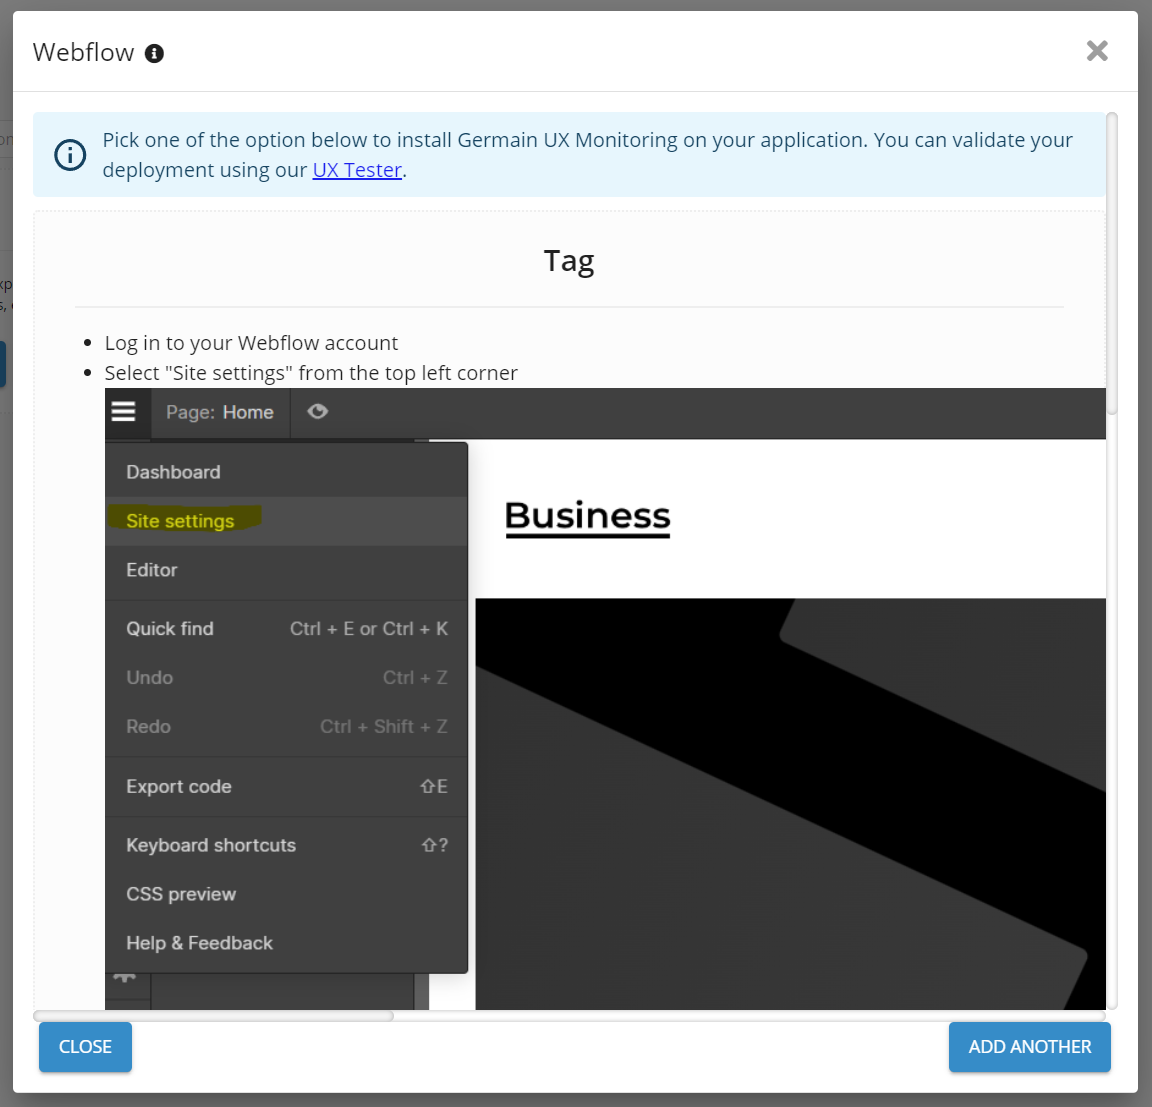
4️⃣ Inject GermainUX into Webflow
Follow the installation steps generated by the Webflow Wizard.
Use the exact monitoring configuration generated for the selected UX Monitoring Profile.
Do not manually reconstruct the monitoring configuration when the Wizard already provides the deployment instructions.
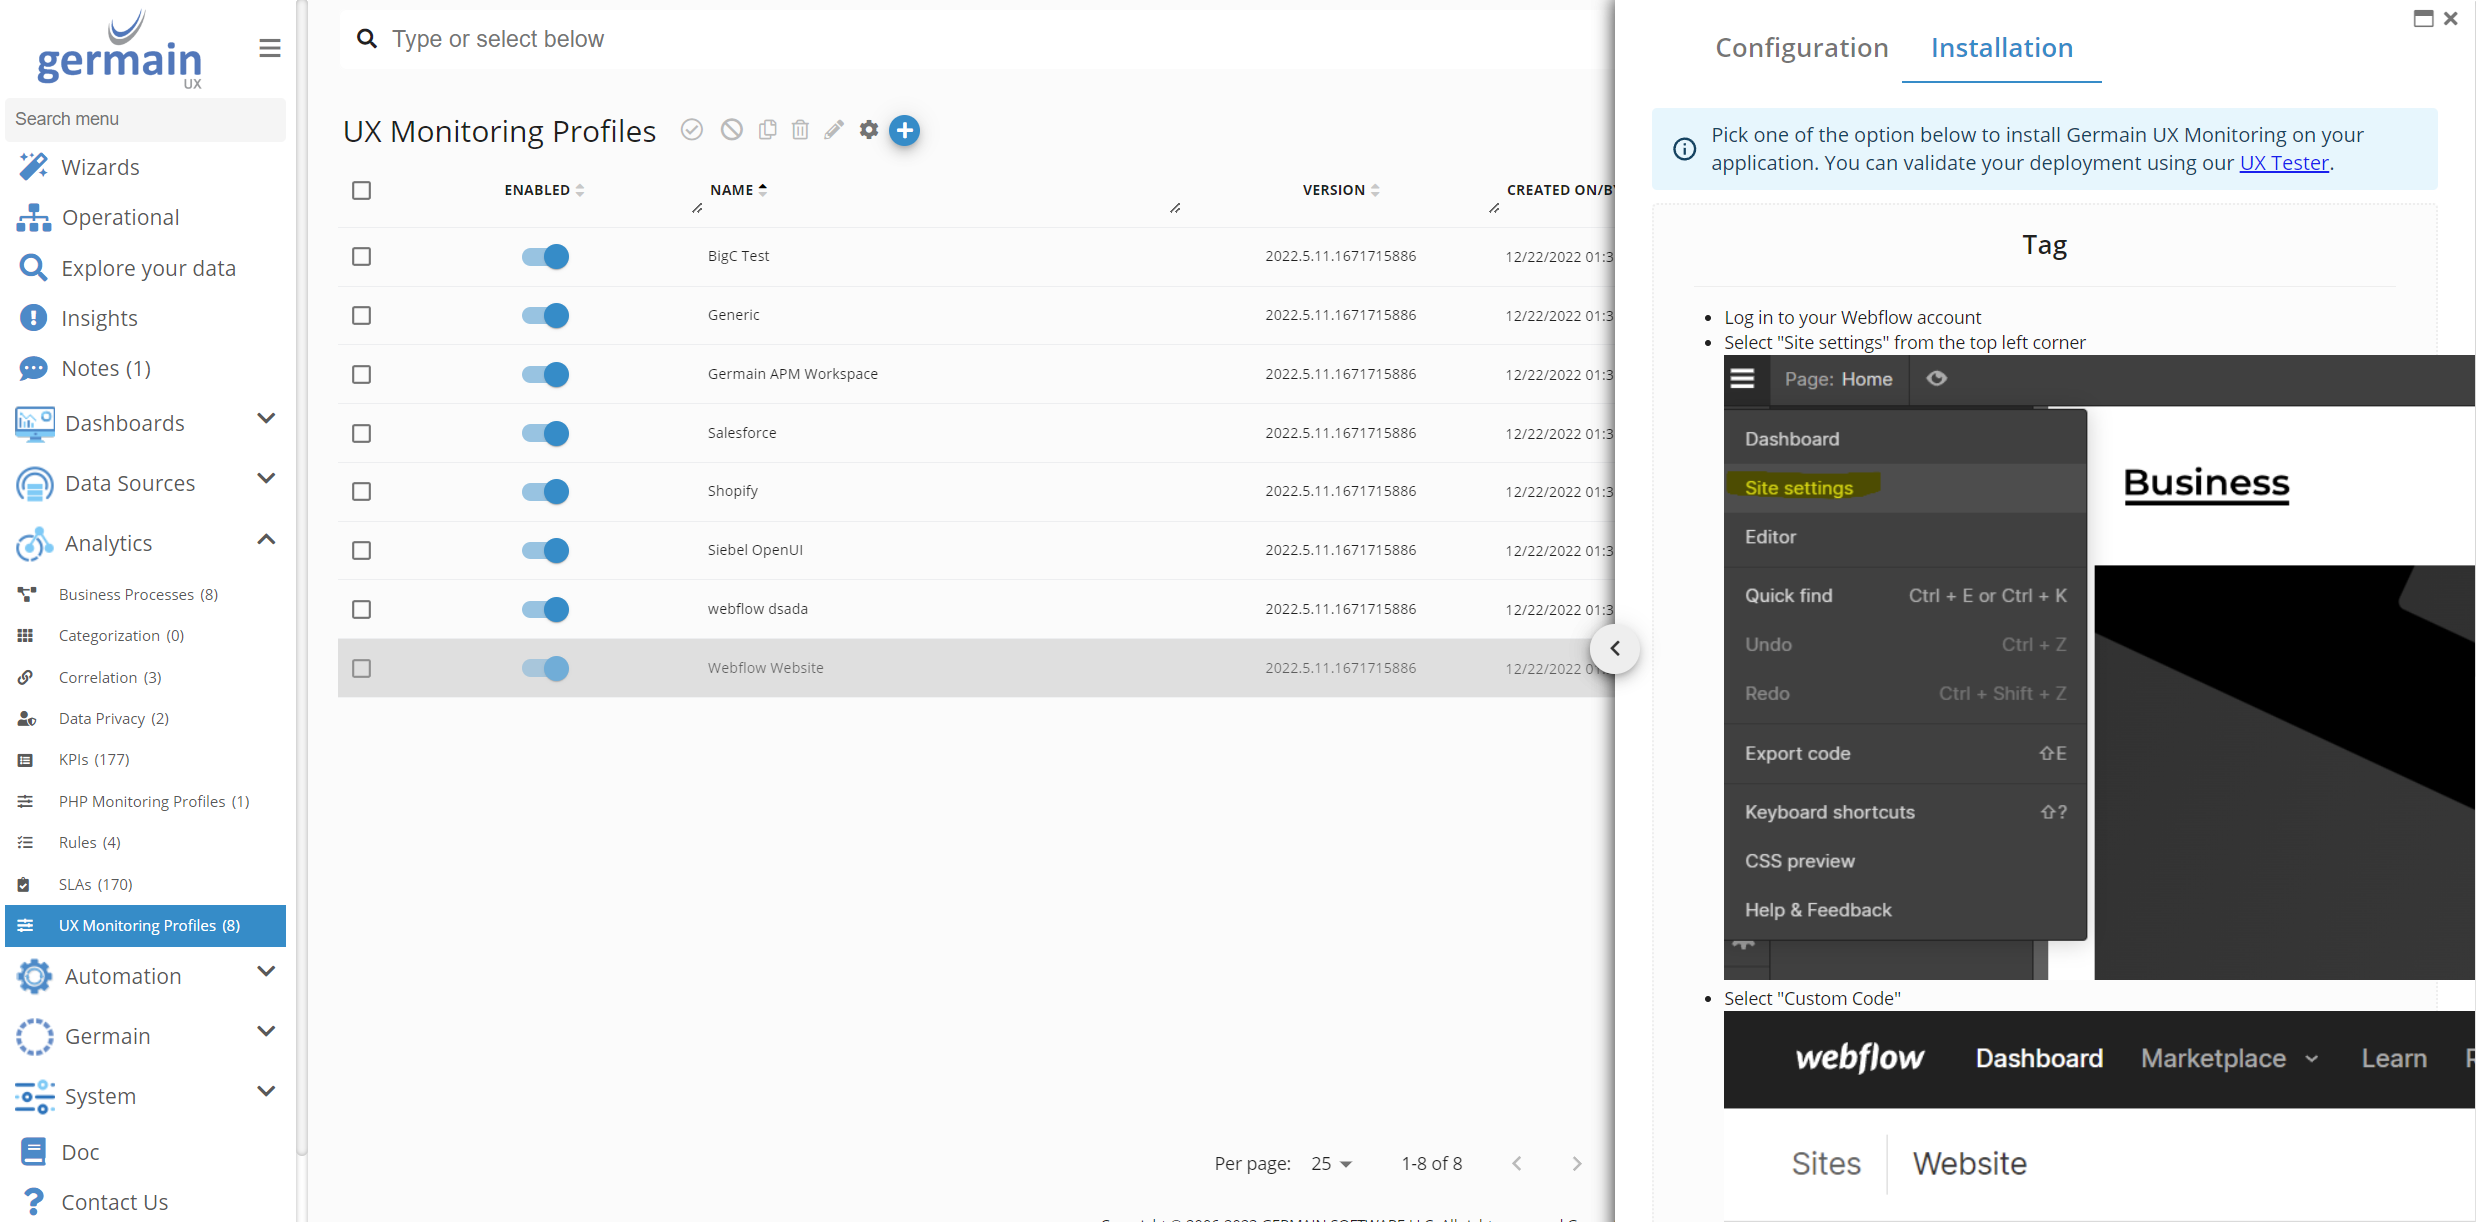
5️⃣ Retrieve Installation Instructions Later
The installation instructions can be reopened after completing the Wizard.
Go to:
Germain Workspace > Left Menu > Analytics > UX Monitoring Profiles
Select the UX Monitoring Profile created for Webflow.
In the Configuration Editor, select:
Installation
The deployment instructions for that profile are displayed.
🔖 6. Publish the Webflow Site
After adding the required GermainUX monitoring configuration:
-
Publish the Webflow site.
-
Open the published website in a supported browser.
-
Navigate through several pages.
-
Perform representative user actions.
Monitoring should be validated against the published website rather than relying only on the Webflow Designer or Preview environment.
🔍 7. Validate Real User Monitoring
In GermainUX, confirm that the expected Webflow data is being received.
Depending on the configuration, verify:
|
Item |
|---|
|
User sessions |
|
Page views |
|
Navigation |
|
User interactions |
|
Page performance |
|
Network requests |
|
JavaScript errors |
⏪ 8. Validate Session Replay
When Session Replay is enabled:
-
Open the published Webflow website.
-
Navigate through representative pages.
-
Perform representative interactions.
-
End the test session.
-
Locate the session in GermainUX.
-
Open Session Replay.
-
Verify the expected activity.
Before production rollout, verify that sensitive information is appropriately protected.
🔧 9. Deploy JS Profiler — Optional
Deploy GermainUX JS Profiler when deeper JavaScript troubleshooting is required.
Use it when additional visibility is needed into:
|
Area |
|---|
|
JavaScript execution |
|
Browser processing |
|
Network activity |
|
Integration activity |
|
Slow application behavior |
🤖 10. Deploy Synthetic Monitoring — Optional
Use GermainUX RPA Bot Recorder to create synthetic scenarios for important Webflow workflows.
Examples:
Homepage → Critical Page → Verify Content
or:
Homepage → Form → Submit Test Data → Verify Confirmation
Use dedicated test data and ensure that synthetic scenarios do not create unwanted production activity.
🔗 11. Deploy REST API Monitoring — Optional
When approved Webflow REST API access is available, configure GermainUX Engine to execute the required API monitoring.
Before deployment, identify:
|
Item |
|---|
|
API endpoint |
|
Authentication method |
|
Credentials or token |
|
Required HTTP method |
|
Request parameters |
|
Expected response |
|
Monitoring frequency |
|
Failure conditions |
Use read-only API operations whenever they satisfy the monitoring requirement.
✅ 12. Validate the Deployment
Before enabling monitoring broadly, confirm:
|
Check |
|---|
|
RUM JS loads successfully. |
|
Correct Webflow application assigned. |
|
Correct domain/environment assigned. |
|
User sessions reach GermainUX. |
|
Navigation is captured. |
|
User interactions are captured. |
|
Page performance is captured. |
|
Network monitoring works as configured. |
|
JavaScript errors are detected. |
|
Session Replay works when enabled. |
|
Sensitive data is protected. |
|
Synthetic monitoring works when configured. |
|
API monitoring works when configured. |
Once deployment has been validated, continue with Configure Monitoring for Webflow.
GermainUX can help determine which monitoring, analytics and automation capabilities are appropriate for your Webflow environment.
ℹ️ Get More Information
GermainUX can help determine which monitoring, analytics and automation capabilities are appropriate for your Webflow environment.
Component: Engine, JS Profiler, Mobile App, RPA Bot Recorder, RUM JS
Feature Availability: 2017.2